Posts

Showing posts with the label Contact point

Handling the matrix band in a diastema closure

Image
 Today I did a diastema closure in composite resin and have a tip on how to handle the matrix band during the procedure. There was uneven addition to both central incisors so I used a clear strip to contain the material for the addition to the first one. I decided to do the tooth that needed the least addition first to allow the most space when doing the second one to place composite. I packed cord and then teflon tape to retract the gingiva to allow me to take the material subgingival for emergence and to block fluid for moisture control. Holding the clear strip wrapped around the tooth i packed small amounts of composite in with a microbrush. I packed this all the way down to the base of the matrix band. The teflon and tightness around the tooth prevented extrusion of the composite and overhangs without a wedge. Even if there was some extrusion, this could be polished off before the other tooth was bonded to. Once I cured the cervical portion, I took the clear strip off and built...

Be careful with using wedges with perio patients

I had an issue recently with the use of a wooden wedge during a class II restoration in a perio patient. The issue was that when I inserted the wedge on the buccal, due to the patient's loose gingiva, the tip of he wedge moved apically and penetrataed through the lingual papilla. As a wedge is inserted, it will contact the teeth either side. As the angle of the roots taper away from each other, the further the wedge is inserted, the further apically it is forced. In a healthy periodontium, it will contact the gingiva and be foced back upwards. In this perio patient, the buccal papilla didn't provide much resistance which allowed the wedge to seat more apically into the tissues. Due to the interproimal periodontal pocket, the interdental col was exaggerated and so the tip of the wedge was guided downwards into the pocket. As I wasn't careful with the insertion, the wedge entered the tissues and went straight out the other side.  This caused bleeding and made moisture control...

Customising wedges

Image
Wooden wedges are very useful tools in restorative dentistry. They allow for the protection of soft tissues during tooth preparation, retraction of the rubber dam, separation of the teeth to protect the adjacent tooth, seal the matrix band against the cervical margin and separate teeth to allow a contact point to be formed accounting for the thickness of the band, thickness of bonding agent and shrinkage of restorative material. The issue with most wooden wedges is that they are too large in an occlusogingival direction so tend to displace and deform the matrix band away from the adjacent tooth. This requires some customisation of the wedge to fit each specific cavity that it is being used on. Burnishing the band doesn't tend to overcome this and just leaves a lumpy surface on the interproximal surface. Ideally we want the band sitting passively against the adjacent tooth without having to force it there.  The next time you prepare a class II cavity, look at the interproximal area ...

Another note on Tofflemires

Image
Working in the public acute care clinics means that a lot of the dentistry that I do when I am there is compromised. The goal is to provide relief of pain and to deal with the patient's main complaint in the simplest, quickest way possible simply due to time constraints. Therefore lately I have found that I am using a tofflemire matrix a lot more than I used to. I've previously written about some tips for using Tofflemire matrices: http://dental-tidbits.blogspot.com/2020/01/limitations-of-tofflemire-bands.html http://dental-tidbits.blogspot.com/2021/03/difficult-restorative-appointment.html http://dental-tidbits.blogspot.com/2020/09/a-note-on-tofflemire-matrix-retainers.html http://dental-tidbits.blogspot.com/2019/09/review-of-old-blog-post.html The difficulties I have found with tofflemires is that initially it is very difficult to get a contact with the adjacent tooth and when you can get a contact it is of poor contour and in the wrong location much to close to the adjacent ...

Review of an old blog post

Today I had the opportunity to review a previous case: http://dental-tidbits.blogspot.com/2018/08/getting-good-contact-with-large-gics.html http://dental-tidbits.blogspot.com/2019/05/review-of-alternative-technique-for-gics.html The entire GIC debonded a couple of weeks ago about a 11 months after placement when the patient was biting on a mintie. It's not a bad result but still needs management. The idea of the initial GIC placement was as a temporary to monitor the pulp status and the tooth has been otherwise asymptomatic. One might question if it's asymptoamtic due to a receeded pulp or a necrotic pulp. The failure was adhesive with the entire GIC lost save for the vitrebond liner so this was placed back when I was doing more indirect pulp caps. As enough time had passed for pulp review I replaced the restoration in composite. I'm a lot less worried these days about causing pain with wedges. The patient consented to treatment without LA and understands there will ...

Review of alternative technique for GICs

A while back, I explored a technique idea for getting stronger contacts with GICs: http://dental-tidbits.blogspot.com/2018/08/getting-good-contact-with-large-gics.html Thinking back on this technique, I don't think it's a good idea because the premise involves compacting the GIC after the gel stage i.e when there is some solidity to the material and it has lost it's sheen. Prof. Ian Meyers maintains that the best bond to tooth structure will be if the GIC is placed against the tooth while it is still flowy and shiny however this method involves manipulation of the material after this stage. Unfortunately, even light compaction of the GIC is likely to cause movement of the material away from the tooth that will lower or even completely remove its bond strength. This is likely why there was a restoration fracture soon after placement. Alternative techniques would be to place a wooden wedge with or without a V ring to get a very tight contact initially with the GIC. If t...

Wedges in perio patients

Take care with interproximal wedging for restorative work in periodontal patients. I was restoring a lower 6 in a patient with minimal recession and deep pocketing and required a wooden wedge to hold the matrix band in place. Care must be taken as the pocket represents a potential space for the wedge to be inserted at the wrong angle into and due to periodontal condition, a larger wedge is often needed. In a cramped space, the wedge often tends to be inserted at an angle too far gingivally. In this case the wedge went deep into the pocket and perforated the lingual gingiva. As the wedge I chose was too small the whole wedge was jammed subgingivally and was very difficult to remove. My tips here are to ensure that a large enough wedge is chosen. If it ever looks like the wedge is too small and the whole wedge would pass through to the other side without too much pressure don't force the wedge in. Also, when positioning the wedge in place, aim slightly occlusally and the contact ...

Restoring conservative class II cavities

Image
Caries that has just progressed past the DEJ can be a challenge to treat. The milder extent of the cavity preparation can be more difficult to manage than large preparations due to the smaller access and higher risk of voids and maladaptation. After preparation, the cavity prep can often appear like in Figure 1. Class 2 cavity preparation. In shallow caries just into dentine the preparation may be similar to the blue shape. Removal of the orange section may improve visibility and access This small prep although conservative and in the patient's best interest it may cause a sub standard restoration to be placed. The small access affects placement of etch, prime and bond as well as the placement of restorative material and access for finishing and polishing. During preparation, the contact may not be broken which will make the placement of a matrix band difficult. You can get around this by using a stiffer band like a Tofflemire and forcing it through the contact or by widen...

Getting a good contact with large GICs

Image
Today I was in a situation where there was a 46 tooth with an MODB fracture. The mesial and distal margins were equigingval. The tooth is set for an endo or and exo but I did not have the required equipment to perform either (In the dental truck). So the plan is a temporary restoration and the patient will seek treatment privately. There are two options from here. -Restore to decent contour and contact -Restore with a stump with open contacts Ideally I would have a good contact to stop food packing but at a copmromise I would consider a wide open contact to allow interdental brushes to fit in. Without anaesthesia which was my plan, Wedges would be painful and making a contact would be difficult. This was due to the equigingival margin. In the past to make a decent contact I have used a light cure GIC like Fuji2LC and restored in stages. Sectional matricies are usually too unstable to be used due to the minimal surface area they are in contact with the tooth and there is the same ...

Placing anterior matrix strips

Image
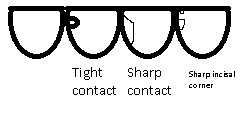
In the past I have had difficulties in placing the clear mylar strips in class 3 cavities where there is a strong or a sharp contact as in the picture below. -Tight contacts tend to bunch up the matrix and when you eventually jam it down it has a poor contour -Sharp contact will do the same, where there is a thin bit or supported incisal edge and it will catch or dent the matrix -Sharp incisal corner i.e if there is a small chip just off the location of the incisal corner. This may be in composite veneer cases where you want a clear strip to separate the teeth or in class 3 cases in a bruxer. I have found the matrix may want to go into this little divot rather than sliding between the teeth Solutions are currently: -Take a bur or polishing disc and cut off the obstruction. This is destructive especially for the tight contact case where there is a fair bit of supporting tooth structure -Use a tofflemire matrix or other metal matrix. This is more rigid and can be forced between th...

Sectional matrix bands

Short post here, When restoring and adjacent MO and DO with sectional matrix bands, it is useful to place both matrix bands at the same time. if you pace one at a time then you may find the first restoration may sit somewhat into the 2nd cavity. this may result in a poor concave contour on the 2nd restoration. the first band can be removed after the first restoration as we want to minimise the thickness of the band to get the best contact.