Posts

Showing posts with the label aesthetics

Anterior aesthetics part 4: Anterior tooth forms

Image
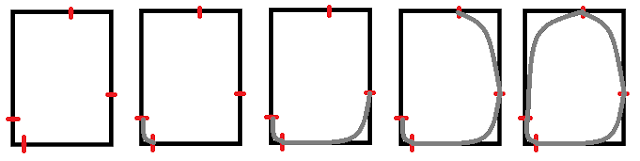
Anterior tooth forms are simple to design when broken down into parts. As covered in previous blog posts we start the design with a rectangle. The length of the tooth is determined when considering the incisal edge and gingival margin positions. From this, the mesial-distal dimension can be judged when considering the ideal ratio of the tooth as it sits in the mouth. Once the position and size of the central incisor is defined, the other teeth can be designed more posteriorly. Canines are narrower than canines anatomically but tend to be the same length. Therefore then appear thinner in proportion. The rectangle defines the border of the tooth as viewed from the labial. From here, defining certain points on the borders of the rectangle will allow you to join the dots and define the form of the tooth (Figure1) . These points are: -Mesial and distal contact points which also define the incisal embrasures (the negative space that is formed between the incisal edge and interproximal sur...
Anterior aesthetics part 3: Tooth position and design

Image
Designing the shape of anterior teeth is more difficult than it sounds at first but does become easier after a study of dental anatomy and a systematic process that is followed. There are certain rules that must be followed to create anterior tooth shapes that are aesthetic and also mimic nature. Between these rules there is room for creativity in terms of tooth colour, textures and variations that can allow the operator to add a personal touch to the case. When designing anterior aesthetics, start with the central incisors. The position of the central incisors is paramount to the position of the entire dentition as they are the most aesthetically important teeth and all teeth posterior to them are designed based on the central incisor position. This is analogous to full denture design: The incisal length, midline and incisal angle is one of the first things we design into the wax rims and the occlusal plane is designed from this point backwards. When designing the position of the ...

Anterior aesthetics part 2: Tooth design

There are rules for tooth shapes that should be adhered to if you want to create beautiful, natural restorations. These pertain to the shape and dimension of teeth, tooth textures, line angles and negative space (which is defined by embrasures, contact points, gingival margins, incisal edges). There is some wriggle room for creativity within these rules but be sure to adhere to the basic outlines or your restorations will look unnatural. Purposeful aesthetic design of tooth position: -Left and right hand sides of the arch will not be perfectly symmetrical. The central incisors should be as symmetrical as possible but the importance of symmetry lessens the further from the midline you are and minor asymmetry in gingiva and tooth shapes can give a more natural appearance to a certain extent -Upper central incisors are anatomically the widest anterior teeth and as they are perpendicular to the viewer they appear as the widest and most dominant tooth. Therefore imperfections in their d...

Anterior aesthetics Part 1: Smile design

So I was waxing up a case last week and realised that I had completely forgotten what front teeth looked like. So I caught up on some anterior aesthetic lectures and wrote down the tips and rules to follow when designing anterior teeth. As long as you stay within these rules, your restorations end up looking more natural and aesthetic. There is room for creativity within the rules but the rules themselves are quite important to stick to: -When designing your smile digitally you want to move from macro details to micro. Start with aligning your full face smile photograph making sure the teeth will be designed straight. -Look at lip at rest photographs to see the incisal display. Older patients will tend to show less upper teeth and more lower teeth. Lower teeth tend to be more visible during speech and upper teeth tend to be more visible during smiling. This photograph will start to give you an idea where you want your incisal edges to finish. Use your judgement in the context of the...

Altered passive eruption

When planning aesthetic cases one of the first thing you must decide is the position of the incisal edge. This has important implications in vertical dimension and soft tissue management. Wear cases often affect this. Altered passive eruption can occur in anteriorly positioned bruxers. It results when attrition results in overeruption of teeth with brings the bone and soft tissue with it. In anterior bruxist cases there will be minimal wear on the posterior teeth and no loss of vertical dimension. They will also generally show a disparity of the gingival margin heights with the maxillary incisor gingival margins being positioned too far incisally. Provided the aesthetics was acceptable before the altered passive eruption, these patients do not usually benefit from opening the VD or lengthening the incisal edges as the maxillary display will usually be too excessive. Instead, they may benefit from procedures such as intrusion of the incisors  to allow restorative space and move the ...

Why do thin biotypes receede?

Thin gingival biotypes are notorious for their fragility and predisposition to recession. When examining the blood supply to the gingiva it reveals some interesting points. Blood supply to the gingiva occurs mainly through the periosteum however the papillae have a more rich and varied supply. It receives blood flow from the periosteum, periodontal ligament, surrounding tissue and crestal bone. When viewing the crestal bone through a microscope you will notice small arterioles exiting at the crest to supply the soft tissue. Incidentally this is the site that allows intraosseous infiltration without drilling into the bone. Blood supply is the most important consideration when handling soft tissue and techniques about handling and flap design all take this into consideration. Many people when viewed on a CBCT will show inadequate buccal bone coverage with severe dehisence almost to the apex of the tooth. The buccal of a tooth is also the site with the least keratinised and attached tis...

Where to start a full mouth rehabilitation?

If doing a rehab case of uppers and lowers together, aim to finish the form of the lower arch first. This is because the lower arch is the arch where the aesthetic and occlusal surfaces are the same. Any adjustment of the lower occlusion will result in the change of the aesthetics of the case. However, if you finish the lower arch first, any issues with occlusion can be compensated for in the palatal surface of the upper teeth. Conversely, if you finish the upper arch first and don't get the palatal surface of the upper teeth correct it will affect the position of the lower incisal edge affecting aesthetics.

Tips on crown lengthening

Radiographic planning is best done with a CBCT with the lips retracted and tongue off the palate. This will allow a view on a lateral view that will define the gingival soft tissue and the thickness of the palate if a connective tissue graft is needed. It will show on a lateral view the location of the CEJ and how much enamel is hiding under the gingiva. The amount of crown lengthening that can be done is limited by the aesthetics i.e the length- width ratios (usually around 80%) and the biology of the patient. Depending on tooth positions, you may not only be discussing crown lengthening. If the amount of gingiva to be reduced exposes the crown only with good symmetry between the inclination of teeth then the treatment plan may be crown lengthening only. However if there is significant asymmetry, orthodontics can be considered. If the crown lengthening exposure the root of the tooth you may also be considering crowns or veneers. Pre surgical planning is essential. Bony exostoses...