Posts

Showing posts with the label laboratory

Bite registration for occlusal splints

Image
When making an occlusal splint, we need to provide the lab with an upper and lower impression (digital or analogue) and a bite registration. One arch record is used to make the appliance, the opposing is used to gain the correct occlusion and the bite record is used to mount the models so that the occlusion can be adjusted. The most common bite record that I see taken by my colleagues is either a bite registration in maximum intercuspal position or no bite record at all. This can work out sometimes but from my perspective it is not an accurate bite for splint construction. Essentially, I see a splint as a removeable tool to reestablish the patient's occlusion at an open vertical dimension. When the patient wears a splint, their vertical dimension is opened, and the teeth should ideally contact evenly all around the splint and dynamic movements should be controlled as well. This is what we are aiming for with tooth-tooth occlusion as well. Therefore, the bite records for a splint sh...
Photography and anterior waxup course

 Recently I attended an anterior waxup course and photography course run by Szabi Hant, a technician from Perth who works with Tony Rontondo, a Brisbane based prosthodontist. Overall, I could tell he was a very knowledgeable and skilled technician but not the best lecturer and demonstrator. Over the two days, this manifested in different ways.  The hands on component of the waxup course were him waxing up 3 anterior teeth on a stone model projected in a screen for the class. I think there was a lot of muscle memory involved and he proceeded through the waxup with some explanation as to what he was doing and important things to look out for but not much explanation in terms of finer aspects. For example, I would have been good to get his take on how to handle and manipulate wax and some more theory on instrument choices and wax types. To be fair, he made a valid point that the hands on component was the most important aspect of the course and the bulk of the time was spent on t...

How to avoid breaking stone teeth off the model

It has been countless times that I or the technician have broken teeth off the stone model. Gluing the tooth back onto the model leads to unnecessary fragility and inaccuracy of the model. I am breaking them off less frequently these days but this involves identifying the risk factors for breaking teeth and employing strategies to avoid this occurence. Risk factors: Essentially, anything that introduces an undercut or a thin isthmus of stone.  - Tilted teeth especially proclined or retroclined incisors. Breaking off molars is less frequent as they are short and wide and have less severe undercuts -Teeth with reduced periodontium. This introduces black triangles for material to lock into and increases the undercut as the root diameter is less than the crown diameter. The more severe there perio, the thinner and weaker the root will become. -Triangular teeth: Same issue with black triangles -Porous stone: If the stone is poured with lots of bubbles, the void in the stone will act as ...

Special tray material

 The special tray material I have encountered come in the light cured and chemical cure varieties. The light cured variety is rougher and are premade in thin sheets. Therefore they are simpler to use as an acrylic baseplate for wax rims/bite blocks and the wax can stick to the rougher surface and they can be made thin to leave space to set teeth. They also seem stronger in thinner sections compared to the chemical cure variety. One thing to note is hat although the chemical cure variety comes out a lot smoother and may be nicer for the patient, if it is heated, it tends to soften and melt slightly. This can be beneficial as adjusting it on a trimming wheel, the excess slumps together and can be peeled off compared to light cured tray material which will produce a lot more dust. However, the downside is that for denture impressions, heating the tray in a flame is ill advised as the tray will soften and become deformable. For crown and bridge, and other impressions where the extensio...

Tips for diagnostic wax-up

During my free time I spent a little while playing around with waxing up anatomy on a set of models which taught me a lot about anatomy and the handling of wax. Below are some tips I thought of at the time: -Use good quality wax. Better quality wax will have the ideal melting properties and strength to allow ease of use and longevity. You don't want the melting point it too high as it will solidify before you place the wax. Too low and it will be too runny and will take too long to solidify making your waxup take much longer. -The model need to be very dry before you wax up onto it or the wax won't stick and will come off with manipulation or the creation of a putty stent -Use fine instruments to place the wax as they are more precise. For a long time I was using a lecron carver because that was all that was available for I trialled using an old, blunt sickle probe with good results. -Set up your work station for maximum efficiency. Keeping your instruments arranged neatly...

The protrusive bite

Image
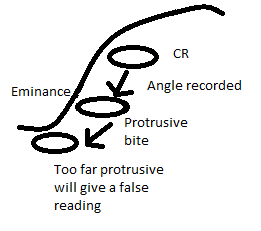
In complex rehabilitations cases, the more records that you collect often results in less adjustments on insert. Multiple unis prosthodontics removes the stability of the casts on mounting therefore the bite record is paramount. The protrusive bite becomes necessary to program the condylar angle on a semi adjustable articulator. One of many variations in human anatomy, the condylar angle has implications for guidance of the mandbible in protrusion and laterotrusion from CR. It represents the steepness of the articular eminence that the condyle translates down (Figure 1). Steep condylar angles will result in rapid disclusion of the dentition from CR whereas shallow condylar angles will have quite subtle disclusion. Figure 1: The angle of the articular eminance determines the path of the condyle as it translates forwards. The protrusive bite must not be taken too far forwards as it will give a false reading as the condyle translates over the cusp of the eminence. The protrusive bi...

Boxing impressions to pour up

Boxing impressions can be beneficial before pouring up casts because upon removing the impression from the cast the cast will be of ideal shape and will require minimal adjustment. Inverting impressions onto a stone base can be harmful as if the stone base is too firm it can distort the stone overlying the impression especially over unsupported areas. Also, water in the stone mix rises upwards against gravity so inverting the impression will result in a higher concentration of water at the working surface resulting in a weaker cast predisposed to chipping. Boxing allows for the impression to be poured without inverting. Steps: 1. If it is a lower impression, the lingual area must be blocked out with a sheet of red wax. Trim a wax sheet to the approximated shape of the lingual area and seal 2-3mm from the sulcus depth with sticky wax or a hot wax knife. 2. Soften a sheet of red wax and fold over the long edge once. Cut a thin strip ~2mm wide. This will result in a strip ~3mm thick ...

Fabrication of a michigan splint. Lab steps

Today I witnessed an educational demo of the fabrication of a michigan splint from start to finish. 1) take alginate impressions of upper and lower. Make sure there are no tears and distortions and that the alginate hasn't come away from the tray at all as that will distort the tooth shapes of the cast 2) Pour the cast up in dental stone and trim. Don't remove bubbles as removal can be unpredictable and excessive removal of stone will result in high spots on the acryllic which though small can cause rocking of the final appliance as it will not fit closely to the fitting surface. When it will interfere with occlusion, you can use a sharp scalpel to trim it slightly. 3) Take a wax bite of the pt at the desired bite opening. a good estimate is 3mm anteriorly and 2mm posteriorly to allow for bulk of acryllic. The idea of a splint is to disocclude the teeth to avoid locking movements during grinding. the wax bite should cover all the teeth and have sufficient bulk. take the wax ...