Posts

Showing posts with the label Records

One tip to reduce gagging in maxillary impressions

 There are a few tips that I have learned over the years to reduce gagging during impressions but a common one that I use is to use a mandibular impression tray for the upper impression. This is useful when you just need an impression of the teeth and don't care about capturing the palate in your impression. The idea is that there is less impression material in the tray compared to a maxillary tray and when the excess spills over the tray edge when it is seated it doesn't shoot directly to the back of the tongue. I tray to use a fairly stiff mix for these impressions and when the excess runs over at the palatal aspect, I will use my finger to pull it fowards towards the incisors. This keeps it off the tongue and also locks the impression more firmly onto the tray. You do have to be aware that the lingual flange of lower trays are usually quite exaggerated so overseating the tray will hit onto the palate. This can help as it can be a positive seat to stop the tray overseating an...

Common dental photography errors Part 1

Image
 I'm continuing the theme of photography and records with this post with a few of the most common photography errors that I have made and learned from, but still make from time to time. These errors may harm the diagnostic quality of the photos. If we are going to the effort of capturing the photos in the first place it is important that we try our best to make them the best quality and as useful as they can be.  I made a post previously about some basic camera settings which may be useful for complete camera newbies: https://dental-tidbits.blogspot.com/2020/04/basics-of-photography.html  Buccal shots should be perpendicular to the teeth   This is one I learned at the Orthoed Minimasters. For orthodontically diagnostic images, the buccal shots must show the canine and molar relationship accurately. This means that the photos should be taken perpendicular to the posterior plane of occlusion. Most commonly, the buccal shots are taken angled from the anterior as we...

New patient standardised dental phototography series

Image
 I have been taking a standardised set of clinical photos for my patients for a few years now. Mainly for new patients or existing patients to the practice which I am meeting for the first time if they have something that requires in depth discussion. I find this to be hugely useful in communication and patient acceptance of their condition. I will try to go through my approach to photography in future posts but I mainly wanted to show the set of photos that I take on a daily basis. My photos aren't perfect, there are some things I would like to start doing when I can be bothered, like paying attention to the magnification ratios on the lens to standardise my photos more. However my photography has improved a lot since I started to play around with it back at dental school. Basic new patient photo set in sequence:  Close up smile Retracted frontal Retracted frontal half open Retracted right buccal in occlusion  Retracted right buccal half open Retracted left buccal in occ...

Records for full mouth rehabilitations

Below is a general outline of the steps required to rehabilitate an arch or two in ceramic. Records are essential in these cases both for the success of the case and for medicolegal reasons. The more records we provide the technician the more chance we have of a successful case and less adjustments in the final. Supplemental procedures such as orthodontics, root canal treatment, implant placement and crown lengthening will fit in in certain stages of this protocol. Consultation appointment Case discussion, treatment and financial consent Radiographs: OPG/CBCT for screening supplemented with bitewings or PAs as needed Extraoral photographic records: Full face: Rest and full smile Lateral face photograph Smile close up Intraoral photographs: Retracted full anterior  Retracted 45 degrees left and right Buccal segments mirror Occlusal mirror maxilla and mandible Contrasted maxillary and mandibular arch Upper and lower impression in Medium body and PVS light body was...

The protrusive bite

Image
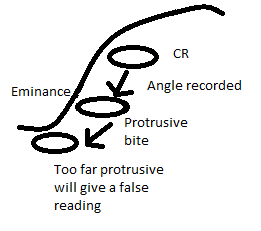
In complex rehabilitations cases, the more records that you collect often results in less adjustments on insert. Multiple unis prosthodontics removes the stability of the casts on mounting therefore the bite record is paramount. The protrusive bite becomes necessary to program the condylar angle on a semi adjustable articulator. One of many variations in human anatomy, the condylar angle has implications for guidance of the mandbible in protrusion and laterotrusion from CR. It represents the steepness of the articular eminence that the condyle translates down (Figure 1). Steep condylar angles will result in rapid disclusion of the dentition from CR whereas shallow condylar angles will have quite subtle disclusion. Figure 1: The angle of the articular eminance determines the path of the condyle as it translates forwards. The protrusive bite must not be taken too far forwards as it will give a false reading as the condyle translates over the cusp of the eminence. The protrusive bi...

Why take clinical photographs?

Clinical photographs provide a wealth of information about a patient's clinical situation. It is the only record that demonstrates accurate reproduction of tooth shape and colour and it is the record most easily interpreted by our patients. Despite the extra time and effort involved, there are many reasons to take clinical photographs in daily practice: Photographs are useful as clinical records. Full arch photos show a true to detail snapshot of the patient's condition on the day. From a set of full arch photographs you could almost perform a full examination in terms of charting restorations, caries and wear. Treatment planning: Complex treatment plans can rarely be constructed on the spot. A set of models and full clinical records can be a substitute to having the patient in the room and time can be taken to treatment plan off these records. Models alone don't consider the patient's tooth position in 3 dimensions relative to the face and smile line. Communicatio...

Notes

Stay back at the end of the day and review your notes and xrays. You owe it to the patient and yourself to have good notes and not miss anything diagnostically. Always ask yourself: "if this was taken to court, would it be defensible?" Professionally written notes are important as someone reading back on them can question your level of knowledge etc. Everything needs to be in writing or it didn't happen. If you got correspondence from the patient's GP, then that needs to be in writing in a formal letter from them. But don't get that during their work hours, you can send off an email and they will reply at the end of their day (as you can be disturbing their daily schedule)