Posts

Showing posts with the label Xrays

The SLOB Rule

Image
 The SLOB rule is a radiographic rule for determining the location of certain objects intraorally with 2D xrays. I forgot about this rule until very recently when I saw a youtube video on it. There are many helpful youtube videos that will be much more helpful than this post as it is good to see the relationship of the objects in motion and with actual examples of xrays taken.  The SLOB theory is essentially grounded in geometric principles. Use of this rule allows the clinician to determine the buccolingual relationship of two intraoral objects with 2 plain films. SLOB is broken down to " S ame L ingual, O pposite B uccal" meaning that if the objects shift to the same side as the xray tube head is moved, the object is on the lingual and if the object in question moves to the opposite side, it is on the buccal. The SLOB rule is useful in endodontics as it can be used to determine which of the canals or roots is which on the plain film. Once a 2D xray is taken, all spatial rel...

Be quick with your xrays

I did mention this tip a very long time ago (while still a dental student) but watching my colleagues has reminded me of several pet peeves that I used to be guilty of. Xrays are uncomfortable, we want to therefore do them as quickly but without compromising diagnostic quality. I am not talking about minimising exposure time because there really isn't any difference in comfort between 0.125ms and 0.250ms.What I am referring to is having everything prepared in advance i.e your DA setting up the film holder and film and most importantly positioning the xray tube before you place the film. Most patients find it incredibly uncomfortable to bite down on xray films and it is nerve wracking watching my colleagues place the film and waste an extra ten seconds pulling the xray tube from the wall with the patient writing in front of them Knowing that at any point the patient will give up and open and the xray will be ruined. There are a few things you must do to prepare the patient for th...

Stop and stare (at your xrays)

As dentists we tend to be problem focused and so have the problem in mind when we analyse a situation. Interpreting xrays is one problem that this attitude can lead us into strife. Since we are teeth focused, we tend to ignore non dental landmarks on a film such as an OPG but forget we are responsible for interpreting everything that is present on any particular radiograph. Similarly, in bitewings and periapical radiographs  we may be giving them a quick scan for obvious pathology and missing subtler aspects such as widening in PDL or bony lesions. During endodontic treatment we may be so focused on the apex that we fail to notice things such as perforations in the coronal aspect or missed canals. Prior to extractions I would suggest that you have an OPG and zoom into the tooth in question and force yourself to stare at it for a good minute to notice the subtler aspects of the treatment to be performed. Often times what appears as conical roots from a distance may be masking an a...

Gutta percha points to track into abscesses

Some clinicians advocate the use of a small gutta percha point inserted into a draining or non draining sinus to track to the apex of a tooth then taking a PA radiograph. In my opinion this makes for a nice photograph but isn't always necessary. It is true that the abscess may not always be located directly next to the infected tooth (especially in kids whose bones are much less dense) but often the signs should be there along with a radiolucency on the PA to allow sufficient diagnosis without the addition of the GP point. Situations where a radiolucency may not be apparent may be where the root apex is fenestrated or closely situation to the buccal bone so little to no bone loss has occuredto allow the pus to drain through the soft tissues. The apical formamen may also be located a few mm from the anatomical apex on the buccal aspect so no apical bone is required to be resorbed to drain the abscess. There may also be overlapping of other structures e.g maxillary sinus that may h...

Don't trust bitewings

Bitewings are a narrow view into a wider area. Generally, a size 2 film which the majority of dentists will use will show 4-5 teeth in view. This will usually miss the 8s, distal of the 7s and distal of the 3s depending on the anterior posterior positioning of your film. The posterior lateral surface of the tongue will tend to push the film superiorly and anteriorly and the curvature of the mandible will stop the film moving too far forwards. Caries will only present on bitewings when a significant portion of the buccolingual width is involved. Therefore as it is well known, they are useful for diagnosing interproximal caries where the buccolingual width is narrow near the contact point. However, a few things can confuse the interpreter of the radiograph: Occlusal caries is unlikely to show up on a bite wing until large. If you see a radiolucency at the base of a fissure, it is very likely to be carious. Buccal and palatal pit caries show up better as they penetrate into the tooth...

A hint for taking xrays

Image
Thee places that patients have the most difficulty with handling intraoral films are any lower films due to lack of space and proximity to the sensitive tissue of the floor of mouth and upper posteriors due to gagging. I believe I've already made a post about managing gagging with impressions and intraoral films so this will focus of xrays of the lower teeth. The most common film including the lower teeth is the bitewing. This is an excellent tool to screen for interproximal caries, subgingival calculus and bone loss. Compared to a lower PA radiograph it is fairly well tolerated. Situations where it is not tolerated are gaggers, obese (who have significant increase in tongue size), and nervous patients who have increased muscle tone during procedures and are less likely to follow your instructions. There are 2 options of films each with their own pros and cons: -Thin PSP or analogue films: These tend to have sharper edges and have more issues in the feeling of cutting the fl...

Imaging of the maxillary sinus

There are multiple methods for viewing the maxillary sinus including: 1. Panoramic radiography 2. Water's view 3. CBCT 4. MRI Panoramic radiography has a focal trough that closely resembles the dental arch and so pathologies and abnormalities outside of this focal trough will not be properly imaged. Fluid levels often found in acute sinusitis are not well demonstrated in OPGs. Therefore MRI and CBCT 3D imaging are the gold standard for sinus imaging. We should therefore strive to detect abnormal symptoms and abnormalities on OPG radiographs and provide a diagnosis to avoid unneccessary specialist referrals and diagnostic tests. -Inflammatory diseases Sinus inflammatory conditions are most visible on an OPG when they are on the floor of the maxillary sinus most commonly the mucous retention phenomenon -Mucous retention phenomenon Smooth dome shaped swelling of the mucosa with homogeneous density Rarely symptomatic Requires no treatment Has no relationship to sinus obs...

Film techniques (The finger technique)

Image
The finger technique involves the patient holding the film intraorally while it is exposed, this simplifies the process, gives the patient more control of the situation, may be more comfortable for the patient. On the other hand it is less reproducible, more chance for error as we are relying on the patient positioning the film, expose their hand to radiation and can have some infection control risks with the saliva on their hand. -Use the hand that is opposite the side of the arch you are exposing. - index finger for upper posteriors, thumb for anteriors and lower posteriors -They should be applying just enough pressure to hold it in place -Lower posteriors are difficult but you place the film first, then YOU apply downward pressure while they provide pressure against the tooth. This should be enough to hold it in place while you expose the film -A hemostat can be useful on the occlusal aspect of the film to give them a platform to press onto

Tips from Dr. Renner

Image
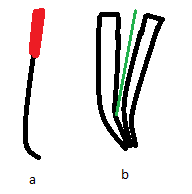
You can apply apical force with a file, there is minimal chance of fracture if you apply apical force only without rotation. You might bend the file in one itself but it probably won't break. It is when you start rotating as well that files separate. When there is a curve at the apex of a root canal, curve the file in the apical region (a) as if you enter with a straight file it will hit the outside of the canal curve and feel like a hard stop (b). If you curve the file you must have the curve facing the same way as in the canal (A radiograph will help) but to get a more precise feel you must apply apical force only, withdraw vertically, rotate slightly (Not locked into the canal) and reapply apical force. At a certain point in the rotation you will find a spot where the file progresses further than all the other positions. This means you have negotiated the curve. from then it is short vertical filing motions. If you pull too far out you may lose the location. Once the file is w...

Endo xray protocol

Lower molars with two mesial canals and/or 2 distal canals may overly each other in the working length PA. It is useful to have a protocol e.g Distal canal and Buccal canal PA then Lingual canal PA. The 2nd PA can recapture the distal canal if it is incorrect. Upper molars often have 2 MB canals (MB1/MBB, MB2/MBL). These may be overlaid by the palatal root. Therefore, a first PA with MB1 and MB2 and D with a 2nd PA to capture the Palatal canal may be useful.

PA or OPG for extractions

An OPG can provide useful information when extracting multiple teeth with the benefit of lower radiation exposure than multiple PAs. However, A paralleling technique PA will provide the maximum level of quality of the root structure. This can be essential in treatment planning the extraction of roots with fine anatomy such as bulbous roots, curved root tips etc which may not be visible on an OPG. When using an OPG to gauge the difficulty of extractions take your time and look carefully under magnification. Look for proximity to adjacent teeth, Root shape and thickness, Size of restorations, proximity to vital structures.
When looking at out of place dental radiolucencies, check for enamel abnormalities e.g enamel fractures that may be on the strangest places and can appear to be carious on the x ray. Radiolucent areas under restorations may be voids or bases. Track cracks with your probe. Separation indicates a need for intervention and if they track subgingivally on the most posterior tooth this requires referral to an endodontist to assess the tooth for suitability for restoration.

Real image, double real image, ghost image

Image
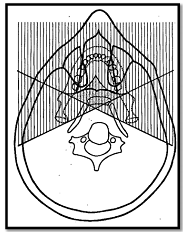
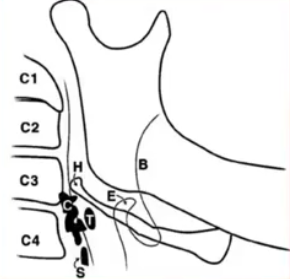
OPG beams originate from behind the patient. As it is 3D projected onto 2D there are many superimpositions. These may be real images, double real images, ghost images, soft tissue, airway spaces. Double real images are formed in the central diamond area as the beam will pass through here twice. -One image is the mirror image of the other -Both images are real -Each image has similar proportions -Each image has the same location on the opposite side -Only occurs with midline objects e.g Hard and soft palate, palatal tori, body of the hyoid, epiglottis, cervical spine Ghost images are formed when the object is between the xray source and the centre of rotation (behind the centre of rotation i.e white area) -Has the same general shape -Appears on the opposite side of the radiograph and is a mirror image -Appears higher up as the xray beam is angled slightly upwards -Appears more blurred -Vertical component is more blurred than horizontal component -Vertical component is...

Radiographic interpretation

Passing through an old radiograph lecture and wanted to list a few hints: -PDL space is thinnest near the middle of the root and wider near the alveolar crest and apex (As fulcrum is where the PDL is thinnest) -Lamina durat is the thin radioopaque area representing the alveolus wall (Socket wall where sharpeys fibres of the PDL insert into bone). This is more dense than surrounding trabecular bone and will be thicker and more prominent with increasing occlusal stress (as a compensating mechanism) -The crest of the alveolar bone is considered normal height if it sits within 1.5mm of the CEJ

Radiographic appearance of tumours

Odontogenic tumours can be classified as benign or malignant. Benign tumours: -Well defined but may not be corticated (margin discernible but border may not be more radioopaque than adjacent bone) -Slow growing therefore: -Displaces teeth -Causes blunt root resorption -Displaces IAC -Expansion and thinning of mandibular cortex Malignant tumours: -Aggressive and fast growing -Ragged or Pencil sharpening root resorption (Mottling of roots) -Erodes cortex of IAC (as opposed to deflection) -Expansion and ragged erosion of adjacent cortex -Loss of lamina dura-> widening of periodontal ligament space -Periosteal reaction

Cervical burnout

Currently trying to find out more information about cervical burnout (CB) and its differentiation from root surface caries (RSC) as I have had trouble distinguishing the two in the past. From what I can gather, -CB appears on the mesial and distal surfaces of teeth in the cervical region - It is a diffuse (ill defined) radiolucent (blacker) area and is bounded by the CEJ and the alveolar ridge -It may be due to overexposure of the film which can "burnout" the thinner sections of teeth. i.e there is lower absorption of the xrays by this anatomical area so if the exposure is high enough, the film in this area will totally "blacken". -It is optically more prominent due to the contrast with the adjacent radioopaque bone and enamel. -RSC has a similar radiolucent bowlshaped area on the radiograph. However, It will generally have a loss of tooth structure i.e in CB there is an intact tooth surface radiographically whereas this is not intact in RSC. Also, CB will sit...

Calcifications in OPGs

Image
Watched a CPD video on OPG calcifications. The main groups were: -TMJ calcifications -Sinus calcifications -Glandular calcifications -Lymph node calcifications Why do they occur? 1. Dystrophic calcification: Most common in OPGs, Damaged/degenerating tissue. Often a sign of ageing but can be pathologic 2. Metastatic calcification: Rarest: Increased plasma levels dt metabolic disorder e.g hyperparathyroidism 3. Calcinosis: Vascular disease where there is calcification in the sub-, cutaneous or deep ST. Assoc with collagen vascular disease 4. Other Where? 3 broad areas 1. Intracranial: Brain, pituitary 2. Maxillofacial: TMJ, Sinus, Salivary glands, lymph nodes 3. Neck: Lymph nodes, ligaments, vascular Maxillofacial TMJ: -Osteophyte fracture: Osteoarthritic changes, breaks off and causes "joint mites" in the joint space - Ankylosis: Loss in height of condylar neck and change in morphology (loss of outline and hypoattentuating area in the joint space) Rare but ...

More on cracks- Caries

Cracks allow bacteria to enter down the passageway and cause caries in the tooth. We often look for signs of caries radiographically and look for a lesion in enamel. Deep dentine caries can be present without enamel shadowing as the caries process starts through a crack which is rarely visible radiographically