Posts

Showing posts with the label photography

Common dental photography errors Part 1

Image
 I'm continuing the theme of photography and records with this post with a few of the most common photography errors that I have made and learned from, but still make from time to time. These errors may harm the diagnostic quality of the photos. If we are going to the effort of capturing the photos in the first place it is important that we try our best to make them the best quality and as useful as they can be.  I made a post previously about some basic camera settings which may be useful for complete camera newbies: https://dental-tidbits.blogspot.com/2020/04/basics-of-photography.html  Buccal shots should be perpendicular to the teeth   This is one I learned at the Orthoed Minimasters. For orthodontically diagnostic images, the buccal shots must show the canine and molar relationship accurately. This means that the photos should be taken perpendicular to the posterior plane of occlusion. Most commonly, the buccal shots are taken angled from the anterior as we...

New patient standardised dental phototography series

Image
 I have been taking a standardised set of clinical photos for my patients for a few years now. Mainly for new patients or existing patients to the practice which I am meeting for the first time if they have something that requires in depth discussion. I find this to be hugely useful in communication and patient acceptance of their condition. I will try to go through my approach to photography in future posts but I mainly wanted to show the set of photos that I take on a daily basis. My photos aren't perfect, there are some things I would like to start doing when I can be bothered, like paying attention to the magnification ratios on the lens to standardise my photos more. However my photography has improved a lot since I started to play around with it back at dental school. Basic new patient photo set in sequence:  Close up smile Retracted frontal Retracted frontal half open Retracted right buccal in occlusion  Retracted right buccal half open Retracted left buccal in occ...

Digital dental photography textbook

I have borrowed the book: "Mastering digital dental photography" by Wolfgange Bengel (2006) as it was one of the recommended books from the Szabi Hant dental photography course.  It is a fairly extensive book and covers in depth very technical aspects of photography and aspects relevant to dentistry. I will not be reading the whole book as it goes deep into certain topics such as how camera sensors work and camera recommendations that are fairly dated. However I will try to extract the more useful points form this text and summarise them on this blog. I find that after taking photographs for some years I can take fairly well exposed, reproducible photos but it would be good to have a theoretical basis behind what I do to understand why a photo doesn't turn out as well as it could and maybe learn a few things about how to make my photos even better. The first chapter talks about why we take photographs in dentistry. Human beings are visually driven people and ...

Grey cards and custom white balance for dental photography

Grey cards are reference cards that are used to calibrate camera software. It ensures that pictures produced by the camera have colours that match the object being photographed. Many factors can affect the colour of the object, the camera sensor just captures the light reflected through the lens so mainly, factors that affect the light source affect the colour. For non dental photography, ambient lighting e.g flourescent lights, weather conditions etc can introduce colours that affect the object. In dental photography, due to the strong flash needed for illumination, most of these external factors are  inconsequential. This can be seen if you expose a photograph with the flash off, you should expect to see a black image due to the small aperture, low ISO and high shutter speed. This means that room lights shouldn't affect the image significantly. Potential flash factors that can affect object colour include: -The plastic cover in front of the flash can yellow with time due to degra...

Photography and anterior waxup course

 Recently I attended an anterior waxup course and photography course run by Szabi Hant, a technician from Perth who works with Tony Rontondo, a Brisbane based prosthodontist. Overall, I could tell he was a very knowledgeable and skilled technician but not the best lecturer and demonstrator. Over the two days, this manifested in different ways.  The hands on component of the waxup course were him waxing up 3 anterior teeth on a stone model projected in a screen for the class. I think there was a lot of muscle memory involved and he proceeded through the waxup with some explanation as to what he was doing and important things to look out for but not much explanation in terms of finer aspects. For example, I would have been good to get his take on how to handle and manipulate wax and some more theory on instrument choices and wax types. To be fair, he made a valid point that the hands on component was the most important aspect of the course and the bulk of the time was spent on t...

Basics of photography

Image
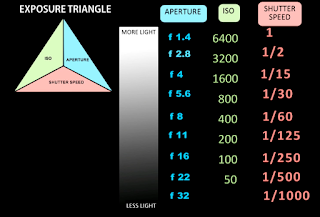
Adapted From Beginner's Digital SLR crash course ebook I have just finished a short ebook indroducing a few concepts about DSLR functions. I was discussing camera features with one of my colleagues and realised that I had forgotten most of the theory about photography. Although in my day to day practice photography doesn't require much thought due to the standardised nature of the photographic framing and lighting it is useful to know about the theory behind those photos to troubleshoot when the image doesn't seem right. Also, to achieve high level photographic effects it is important to know the basics so you can play with certain aspects of the exposure and lighting. This ebook was about general photography and so describes how to play with camera settings in different situations. Much of it is not relevant to dental photography so I will summarise that which I would find useful to know about dental photography. I also supplemented this knowledge includi...

Why take clinical photographs?

Clinical photographs provide a wealth of information about a patient's clinical situation. It is the only record that demonstrates accurate reproduction of tooth shape and colour and it is the record most easily interpreted by our patients. Despite the extra time and effort involved, there are many reasons to take clinical photographs in daily practice: Photographs are useful as clinical records. Full arch photos show a true to detail snapshot of the patient's condition on the day. From a set of full arch photographs you could almost perform a full examination in terms of charting restorations, caries and wear. Treatment planning: Complex treatment plans can rarely be constructed on the spot. A set of models and full clinical records can be a substitute to having the patient in the room and time can be taken to treatment plan off these records. Models alone don't consider the patient's tooth position in 3 dimensions relative to the face and smile line. Communicatio...

Basics of clinical photography notes

Image
Notes taken from the ADA webinar: Basics of clinical photography by Dr. Peter Sheridan Clinical photographs are used for records and documentation but also professional communication, education marketing etc Issues with intraoral cameras are they have a limited range of views. It is easy to use but poor quality, colour and distortion. Can't integrate the image into the whole mouth context or comparison with other teeth Criteria when choosing cameras -Quality of images -Lightweight -Value -Integrated (can buy all hardware from the same manufacturer) -Ease of use -Depth of field -Special features: eg in built post production software -Longevity Lens should be 60mm not 105mm macro lens. These days, DSLRs are using apsc or dx sensors which are smaller which changes the field of view of the lens. The 60mm lens working at 1.5 crop factor and acts as a 90mm lens and the 105mm lens works as a 150mm lens. The 105mm lens will be heavier, have no depth of field, and will go hu...

Photography

Image
-Full smile For this shot, a point-and-shoot camera should be switched to macro mode; DSLR macro lenses should be used at approximately 1:2 magnification. Attempt to take the photo from directly in front of the patient, avoiding a downward or upward angle of view. The patient should exhibit a natural smile, with framing of the photo extending from the right to left corner of the mouth. Point of focus for this shot is on the central or lateral incisors. The horizontal midline should be the incisal plane; the vertical midline should be the anatomic midline.  -Anterior retracted Patient seated with dentist in front. Cheek retractors used with the cheeks pulled outwards away from the teeth. A common mistake is to pull the lips outwards and backwards which pulls the buccal area inwards. Use the largest retractor possible to avoid the centre of the upper and lower lip from appearing in the photo. Air dry the teeth. the teeth should be in MIP but they can be slightly apart to aid in...