Posts

Day 2 of Masterprep VIP (and an existential crisis of sorts)

Warning: This is not a course review but a rambling. Day two was a very draining experience not because of he volume of work or content but just the monotony of the exercises given. I mean this in the sense that we were just prepping plastic teeth the whole day. This highlights the importance to me of taking breaks and refreshing your mind and eyes. I didn't really do this and about three quarters of the way through I was developing quite a headache and eye strain.  After courses like these I find that I don't really know what I've gotten out of the course until a day or two afterwards and I will discover new things as I mull the information and experience over in my head. I came home after the end of the course pretty tired, had dinner and went to bed. I won't write too much about the second day itself because I don't actually recall too much about what we went through. It was essentially discussing the dimensions of the preparations we were expected to do and the...
Fixed pros course

 Just finished day one of two of a fixed prosthodontics course "Masterprep VIP". It's a fairly popular course that a few colleagues had done but isn't particularly well advertised so it mainly gets circulated by word of mouth. The first day is relatively long starting at 8:30 and running relatively non stop until 6:30pm. They said they have shifted the course structure over the years and have put the majority of the theory into the first day and all of the hands on component into the second day because splitting up the exercises throughout the two days wasted time in the transitions between lecture and hands on. This is certainly something I have noticed at hands on courses in the past and in addition, when the hands on component comes along, some people are listening, some are trying to get ahead and if the presenter wants to make an interjection,  it can sometimes be drowned out in the noise and activity. Every one tends to work at different speeds and moving the gr...

Crown impressions on deep subgingival margins

Image
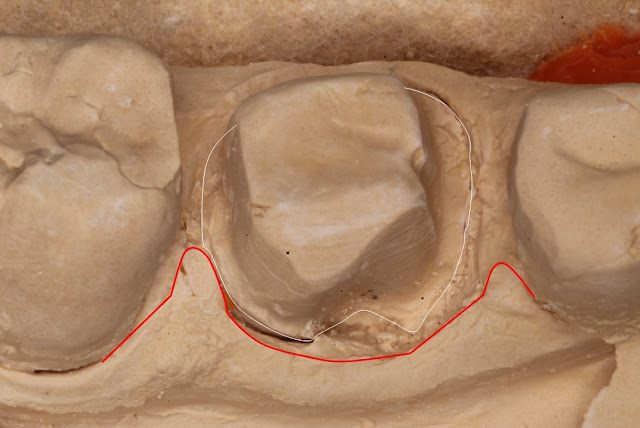
 Today I reattempted an impression on a crown preparation with a deep subgingival margin. It was a very heavily filled lower molar with a subgingival buccal GIC restoration. I knew that the tooth was compromised but had not placed any of the restorations so I didn't know how extensive the restorations were and it was not obvious radiographically. When I removed all the restorations and caries to place a core, I was surprised how deep gingingival the mesiobuccal restoration went. It is hard to tell on the photographs but the midbuccal and mesiobuccal margin was about 4-5mm below the gingival margin. Halfway through the procedure, I didn't many places to go other than to keep going ahead with the plan and see how it turned out. What was surprising was how non inflamed the gingiva was preoperatively despite having such a deep margin. Partly this may be due to the patient's thick gingival biotype or partly it may be due to the margin being buried so deep that the inflammation w...

Endo Z bur

Image
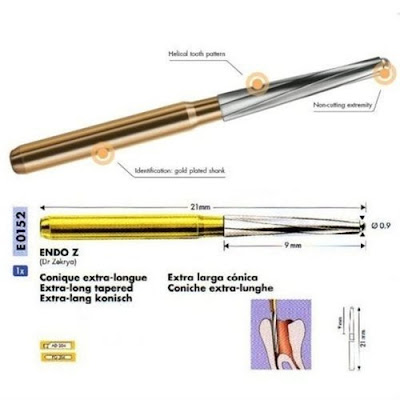
Today I tried an Endo Z bur to open the access cavity for an upper molar. I've used one before but not the way it was intended and not very successfully. The Endo Z bur is a bur specifically designed for the endo access, the bur has tungsten carbide cutting flutes and a non cutting tip (Figure 1)     Figure 1: Endo Z bur design The bur is designed to be inserted into a cavity once the pulp chamber has been opened and moved around to widen the access (Figure 2). The non cutting tip is supposed to be held against the floor of the pulp chamber and when the wall of the chamber is encountered the bur will theoretically stop cutting. It is supposed to make the process of cutting the access foolproof. Note: This is only relevant in multi rooted teeth. It can still be used in single canaled teeth but shouldn't be used with any apical pressure.   Figure 2a: caries is extending into the pulp horn or an access cavity into the pulp horn. 2b: The endo Z bur is inserted into the cavity...

Extraction reminder for myself

 This is just a reminder for myself to know when to call it quits for extractions. I've set a rule for myself in the past that if I'm trying a strategy e.g luxation for 5 minutes or 3 times and have made no progress then I should progress to the next best strategy e.g sectioning the tooth or raising a flap. Pushing on especially when there is some mobility can be tempting but when there is mobility and it is not changing after 5 minutes, there is some bulbosity, root curve, dense bone or path of removal issue that is holding me up. Pushing through can sometimes be successful but if you haven't made any progress in five minutes it is likely that you will just draw out the extraction and stress yourself and the patient out. Instead, make the procedure easier on yourself and progress the procedure on. Today I was wrestling with a difficult wisdom tooth and kept trying different instruments for elevation with no avail. I knew after a while it became ridiculous and yet kept on w...

Handling the matrix band in a diastema closure

Image
 Today I did a diastema closure in composite resin and have a tip on how to handle the matrix band during the procedure. There was uneven addition to both central incisors so I used a clear strip to contain the material for the addition to the first one. I decided to do the tooth that needed the least addition first to allow the most space when doing the second one to place composite. I packed cord and then teflon tape to retract the gingiva to allow me to take the material subgingival for emergence and to block fluid for moisture control. Holding the clear strip wrapped around the tooth i packed small amounts of composite in with a microbrush. I packed this all the way down to the base of the matrix band. The teflon and tightness around the tooth prevented extrusion of the composite and overhangs without a wedge. Even if there was some extrusion, this could be polished off before the other tooth was bonded to. Once I cured the cervical portion, I took the clear strip off and built...

A note on intraligamentary injections

One thing I am never sure of during an intraligamentary injection is "is the needle tip in the PDL space or in the tissues?"Always use a small gauge needle even if you have a large gauge needle out for a block. A larger gauge needle will be too chunky to predictably fit into the PDL space. The angle of the needle is important and should be pointed towards the tooth surface. If it is inserted quite parallel o the tooth it will tend to sit in the gingival tissues and you will feel back pressure but will only be injecting into tissues with nothing reaching the periapical tissues. You may notice quite profound blaching in the area if you're inecting mainly into the tissues. In a thin biotype, it is quite easy for the needle to deflect away from the tooth and pierce the tissues back into the oral cavity. The best indication of a good needle placement is when you pull back, the needle tip is stuck in the PDL space and it is difficulty to remove. A patient with significant apica...