Posts

Showing posts from 2016

Crown cement

Dry the teeth after cementing a crown to find excess cement sticking to hard tissues. These will scrape off with a carver. After setting, rub the soft tissues with a moist cotton pellet to remove cement.

Electrosurgery

Got to use an electrosurgery unit today to lower the gingival margin to expose a restorative margin, a few tips I learned: -There is a pad that must be placed under the patient's back to complete the circuit. This can be outside of their clothes -Use a plastic mirror to avoid electric shocks -The cutting setting cuts gingiva like butter, be very careful and practice your motions before you press the button down - A sweeping motion in one direction with the tip at an angle to the gingiva is best to lower the marin -Get the teeth numb. If you touch the tooth with the electrosurg the patient will feel the electric shock?

Film techniques (The finger technique)

Image
The finger technique involves the patient holding the film intraorally while it is exposed, this simplifies the process, gives the patient more control of the situation, may be more comfortable for the patient. On the other hand it is less reproducible, more chance for error as we are relying on the patient positioning the film, expose their hand to radiation and can have some infection control risks with the saliva on their hand. -Use the hand that is opposite the side of the arch you are exposing. - index finger for upper posteriors, thumb for anteriors and lower posteriors -They should be applying just enough pressure to hold it in place -Lower posteriors are difficult but you place the film first, then YOU apply downward pressure while they provide pressure against the tooth. This should be enough to hold it in place while you expose the film -A hemostat can be useful on the occlusal aspect of the film to give them a platform to press onto

Managing dental fractures

If a patient presents with a fracture involving dentine, it is probably not enough to smooth off the tooth. Restorative procedures involving will involve air and water spray and exposed dentine will be very painful especially in a young patient. Drying the tooth with a cotton roll and applying vitrebond liner over the dentine can be a very effective way of allowing pain free restoration without LA.

Post: Direct vs indirect

Indirect: anteriors up to the premolars. Esp in canal shapes that are abnormal e.g oval shapes where the direct post system won't fit snugly. Indirect posts in multirooted teeth require either split posts or telescopic post Direct: generally posteriors. Less broken down teeth often have undercuts as more of the walls are present. therefore the internal anatomy must be prepped to remove undercuts to allow insertion and removal. Once the external anatomy is prepared for a crown, the remaining wall will be quite thin and may  fall off. In this case, a direct post will be more conservative and if done in composite resin then the remaining thin walls will bond to the core material and is less likely to chip off as compared to amalgam where there is no bonding.

Tips from Dr. Renner

Image
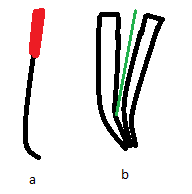
You can apply apical force with a file, there is minimal chance of fracture if you apply apical force only without rotation. You might bend the file in one itself but it probably won't break. It is when you start rotating as well that files separate. When there is a curve at the apex of a root canal, curve the file in the apical region (a) as if you enter with a straight file it will hit the outside of the canal curve and feel like a hard stop (b). If you curve the file you must have the curve facing the same way as in the canal (A radiograph will help) but to get a more precise feel you must apply apical force only, withdraw vertically, rotate slightly (Not locked into the canal) and reapply apical force. At a certain point in the rotation you will find a spot where the file progresses further than all the other positions. This means you have negotiated the curve. from then it is short vertical filing motions. If you pull too far out you may lose the location. Once the file is w...
Today I feel like I've achieved something at dental school. I prepped a 25 (45min) and 26 (45 min) for PFM crown, impression and temporised in the 3 hours allocated. Dr. Thomson seemed pleased. I hope to only grow from here and I am sure that in the future, achievements in the future will seem small to me but it is a milestone nevertheless. (They were good preps too)

A few tips from C. Marshall

A patient presented with an MOD amalgam and a palatal cusp fracture. This is a common sight and most probably needs an onlay or full coverage crown in the future (That's what you'll tell the patient) But to get them sorted for the meantime you can replace the cusp by placing retention grooves in the mesial and distal box sections (Cylindrical preps) ideally non parallel) and restore the cusp only with composite resin or amalgam). The alternative would be to charge the patient to replace the whole restoration i.e a 4 surface restoration and a cusp replacement which may cause them to be less likely to accept fixed treatment in the future. This is a quick and easy solution to the missing cusp that may not even need LA as you won't be cutting into the tooth structure. This is most ideal when the restoration is entirely intact meaning that the occlusal record is unchanged. If your preparation damages the occlusal anatomy in any way you are apparently better off replacing the who...

Cobalt chrome denture design-meshing

When designing a cobalt chrome denture that rests on a tooth with compromised prognosis, you can add meshing to the metal lingual plating that will be covered by acryllic. This will allow the technician to add a denture tooth once the tooth is lost.

Lateral Condensation

In the past I had inserted the lateral spreader passively and applied a force side to side. Today, Dr. Renner showed me to push the spreader down apically slowly and steadily with some force. This was much more effective in creating space for accessory points. The spreader should go down a few mm from the apex and the spreader should be length controlled. It should be removed with rotation of the spreader tip to avoid pulling out the prime point. Be gentle with the accessory point as it bends easily.

Handling greenstick

Dr. Gary smith handles greenstick like a professional, He recently showed me his method of handling greenstick for border moulding. He explains to the patient that he is going to place wax around the borders to capture the periphery. It will be a little warm but he doesn't want it to hurt the patient. He puts the head of the greenstick right at the centre of the blue flame (where the gas is unburnt) but doesn't really spin it around. He doesn't want the core of the greenstick to be melted or the end will sag. He only heads one side of the greenstick. After about 2 seconds, He takes it out and dabs the soft side onto the tray/denture in a tapping motion. This can cause voids and irregularities so he heats the greenstick on the tray over a flame and these will blend out. If he didn't do this then there would be characteristic streaks on the greenstick. It is dipped into hot water more to cool it down than anything (in my opinion) and to keep it soft.  then it is caref...

Pre-endo restorative

Recently I had to access the root canals through a large amalgam that extended into the pulp chamber. This had been placed by a previous student that had wanted to ensure structural integrity of the tooth before endo was commenced. Despite it being a good amalgam restoration, it was compromised by my access as they had not left a covering over the pulp chamber (e.g Fuji) meaning that I had to dig around the amalgam trying to find the chamber without any reference points. Secondly, The amalgam meant that the electronic apex locator was having false positives of being over the apex as the contact with the file cause a closing of the circuit with low resistance (seen at the area just past the apex) When restoring teeth pre endo we prefer GIC or composite.

Always check the soft tissue!

Today I missed an ulcer on the patient's lower lip, on further investigation it turns out the patient has had that same ulcer for a number of years and a previous clinician had recommended a biopsy which she didn't return for. Missing this was a mistake and I need to try harder to check the soft tissues and pay attention to detail. To describe lesions use: 1. Site a. anatomic location (e.g tongue, floor of mouth, palate) b. Adjacent features (E.g adjacent to 34 tooth) c. Unilateral/bilateral d. Localised/Generalised 2. Colour 3. Morphology a. Diameter (mm) b. Single/multiple c. Separate/Coalescing d. Raised/flat/depressed e. Fluid filled/tissue filled/texture f. Margins (Regular/irregular, Raised/smooth, Colour)

Alginate information

Alginate can deteriorate in its powder form within 3 days of opening the container. Exposure to humidity or heat causes thin mixes, altered setting times, reduced strength, high deformation. Contamination with gypsum products in the bowl should be avoided as it can accelerate its set. Don't mix stone and alginate in the same bowls. The water powder ration affects the consistency and setting time of the materials and strength and quality of the impression. a thin mix will flow out of the tray and away from the tissues with increased tear risk. a thick mix will capture less fine detail. Ideally work with a predetermined amount of powder and alter the water. Primary mechanisms of alginate distortion is water absorption (imbibition-Do not wrap in wet paper towels or immerse in liquids) and evaporation of liquids (syneresis occures even at 100% humidity). Distortion exists if impressions are not poured up within 12 minutes of removal. Alginate can stick to teeth (hydroxyapatite)...