Posts

Showing posts with the label Fixed prosthodontics

Creating spacing under temporary crowns
Image
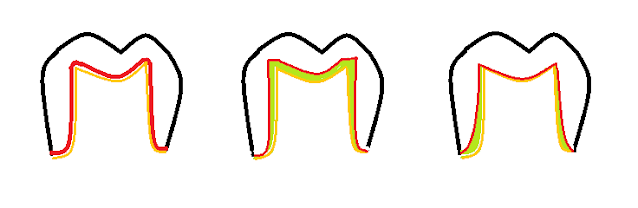
The issue with directly made temporary crowns are that the bisacryl materials are in general too accurate and once cemented, the lack of space under the crowns means that the temporary will always be seated high due to the hydraulic pressure on the cement. This is why when you are checking the occlusion with the temporary crown dry, everything may seem okay but once it is cemented there is usually a fair bit of occlusal adjustment required. The problem is amplified with thicker temporary cements such as eugenol based cements e.g Tempbond as the film thickness is extremely thick and it will be difficult to flow out as you seat the crown down. You may find that excessive occlusal adjustment leads to thinning of the crown and with conservative preps you may perforate or have frequent crown breakages during function. One strategy to overcome this is to use thinner cements e.g Durelon polycarboxylate cement which is technically a permanent cement. This increases the need to section off your...
How to avoid breaking stone teeth off the model

It has been countless times that I or the technician have broken teeth off the stone model. Gluing the tooth back onto the model leads to unnecessary fragility and inaccuracy of the model. I am breaking them off less frequently these days but this involves identifying the risk factors for breaking teeth and employing strategies to avoid this occurence. Risk factors: Essentially, anything that introduces an undercut or a thin isthmus of stone.  - Tilted teeth especially proclined or retroclined incisors. Breaking off molars is less frequent as they are short and wide and have less severe undercuts -Teeth with reduced periodontium. This introduces black triangles for material to lock into and increases the undercut as the root diameter is less than the crown diameter. The more severe there perio, the thinner and weaker the root will become. -Triangular teeth: Same issue with black triangles -Porous stone: If the stone is poured with lots of bubbles, the void in the stone will act as ...

Count your cords

Image
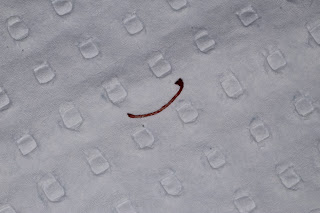
A couple of days ago I  left retraction cord in the gingiva of a patient for the first time. Of course it just happened to be my mother. Thankfully, when I put in cord retraction cord, I am very careful to count exactly how many go in and count how many come out. Unfortunately on that day, as hard as I searched, I just couldn't find the cord. It was a small, size 0 cord and was placed quite far under the gingival margin. A mistake I made was not cutting the cord long enough so ended up putting two different pieces to surround a single tooth. The problem was once I removed one piece, I forgot where the second piece started and finished. Rather than continue to dig around the gum, I finished whatever it is that I was doing, brought her back 2 days later and tried again. The gum was not visibly inflamed but the area of the gum that exhibited bleeding on probing was clearly the place where the cord was present. I probed around the gum and found the end of the cord and removed it. ...

Poly vinyl siloxane putty impressions

At one of my private practice jobs the material we use for fixed prosthodontic impressions is PVS putty with a light body wash. I have used this with reasonable success and it takes reasonable impressions as the viscosity of the putty pushes the light body down the tooth, however this can be disadvantageous sometimes as the putty itself fails to flow. Therefore it will be hopeless in capturing an impression of the sulcus if your light body hasn't made it in there. Additionally, if the tissue is quite floppy, it can displace the tissue out of the way but can just as easily push the tissue back onto your preparation undoing the action of your tissue retraction. Ideally you would put a medium/heavy bodied material on top of the light body to act as an intermediary between the two material viscosities. One issue I've been having coming into the summer months is that the putty reaches an early set stage extremely fast where it becomes stiffer and forms cracks and distortions when pr...

Observing public specialist part 1

Image
I had a day off during the university break and decided to half a day observing in the public specialist clinic. I observed the final impressions of  35 and 37 implants for fabrication of a fixed bridge. This was part of a larger rehabilitation where the other teeth had already been restored with crowns. There was an existing model with implant analogues in it but the new impression was to capture the implant position with the tooth supported crowns in place. I jotted down some notes in regards to this procedure: General notes:  He was extremely neat and particular and knew what to do at each stage of the procedure. his tone was calm and he explained things slowly and thoroughly to his patient and DA. Everything was measured precisely with no haphazardness or waste or sloppiness e.g picking up adhesive on a swab was done precisely with half the swab delicately dabbed in the liquid rather than dunked in as I do. He was precise with the amount of blue wax he put in the embr...

Special tray material

 The special tray material I have encountered come in the light cured and chemical cure varieties. The light cured variety is rougher and are premade in thin sheets. Therefore they are simpler to use as an acrylic baseplate for wax rims/bite blocks and the wax can stick to the rougher surface and they can be made thin to leave space to set teeth. They also seem stronger in thinner sections compared to the chemical cure variety. One thing to note is hat although the chemical cure variety comes out a lot smoother and may be nicer for the patient, if it is heated, it tends to soften and melt slightly. This can be beneficial as adjusting it on a trimming wheel, the excess slumps together and can be peeled off compared to light cured tray material which will produce a lot more dust. However, the downside is that for denture impressions, heating the tray in a flame is ill advised as the tray will soften and become deformable. For crown and bridge, and other impressions where the extensio...

Day 2 of Masterprep VIP (and an existential crisis of sorts)

Warning: This is not a course review but a rambling. Day two was a very draining experience not because of he volume of work or content but just the monotony of the exercises given. I mean this in the sense that we were just prepping plastic teeth the whole day. This highlights the importance to me of taking breaks and refreshing your mind and eyes. I didn't really do this and about three quarters of the way through I was developing quite a headache and eye strain.  After courses like these I find that I don't really know what I've gotten out of the course until a day or two afterwards and I will discover new things as I mull the information and experience over in my head. I came home after the end of the course pretty tired, had dinner and went to bed. I won't write too much about the second day itself because I don't actually recall too much about what we went through. It was essentially discussing the dimensions of the preparations we were expected to do and the...

Fixed pros course

 Just finished day one of two of a fixed prosthodontics course "Masterprep VIP". It's a fairly popular course that a few colleagues had done but isn't particularly well advertised so it mainly gets circulated by word of mouth. The first day is relatively long starting at 8:30 and running relatively non stop until 6:30pm. They said they have shifted the course structure over the years and have put the majority of the theory into the first day and all of the hands on component into the second day because splitting up the exercises throughout the two days wasted time in the transitions between lecture and hands on. This is certainly something I have noticed at hands on courses in the past and in addition, when the hands on component comes along, some people are listening, some are trying to get ahead and if the presenter wants to make an interjection,  it can sometimes be drowned out in the noise and activity. Every one tends to work at different speeds and moving the gr...

Crown impressions on deep subgingival margins

Image
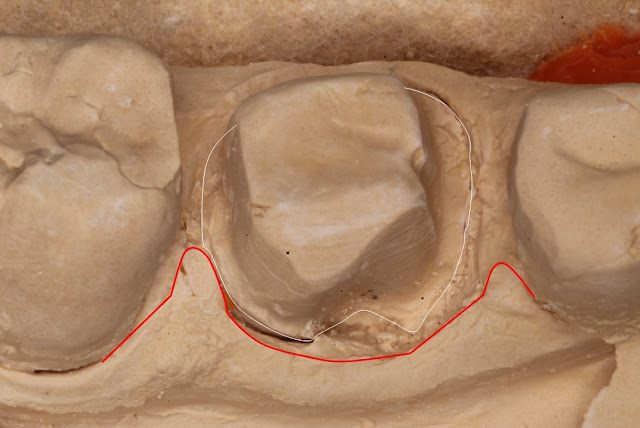
 Today I reattempted an impression on a crown preparation with a deep subgingival margin. It was a very heavily filled lower molar with a subgingival buccal GIC restoration. I knew that the tooth was compromised but had not placed any of the restorations so I didn't know how extensive the restorations were and it was not obvious radiographically. When I removed all the restorations and caries to place a core, I was surprised how deep gingingival the mesiobuccal restoration went. It is hard to tell on the photographs but the midbuccal and mesiobuccal margin was about 4-5mm below the gingival margin. Halfway through the procedure, I didn't many places to go other than to keep going ahead with the plan and see how it turned out. What was surprising was how non inflamed the gingiva was preoperatively despite having such a deep margin. Partly this may be due to the patient's thick gingival biotype or partly it may be due to the margin being buried so deep that the inflammation w...

A few notes on temporary crowns

 Temporary crowns can be tight when seating for a few reasons: -One is that the crown is too well fitting due to the accuracy of the material. Hydraulic pressure from a very parallel crown preparation may stop the crown from seating especially once there is temporary cement in it. Therefore the occlusion may be spot on when trying the crown on but may be too high once it is cemented.  -Deformation on removing the temporary crown can cause it not to seat completely. If the crown comes off in the putty matrix, don't touch it for at least a few minutes to let it fully set before it is manipulated -Shrinkage of the material can cause it not to seat well even if it had fit well initially. This is especially noticeable if there are fine preparation features on the tooth e.g thin slots, grooves or pin preps. -If you have added composite resin to the temporary crown to fix an open contact, it can stop the crown from seating if you have added too much. Therefore it is safer to do one s...

Observing prosthodontics 4

Image
A few months ago I went for another day to observe a prosthodontist in private practice. I had the notes from the day written down but had put off posting it due to laziness. Below are some of the procedures I observed on the day: - Review of suckdown resins to close black triangles: The patient whose consultation that I observed at a prvious visit had had his resin additions done with a suckdown technique to close the black triangles. His black triangles were as a result of triangular teeth with mild recession therefore required a prosthodontic solution. I was observing the review appointment where the teeth were to be separated. Embrasures were cut into the teeth a the bonding visit and spaces opened to allow piksters to go through. Line angles and the location of the proximal contact was defined with the waxup but the teeth were still stuck together. Suck down resin veneers will stain at edges making areas that aren't bonded easier to see staining at first review but doesn'...

Prosthetic limitations of all on 4?

A few months back I encountered a patient in the public clinics who had had an all on 4 prosthesis placed in the maxilla and mandible a few months prior. Personally, I felt as though he was an incredibly highly strung person and at the state at which I met him I would be hesitant to do any large scale dentistry on. His personality may have been a true reflection of himself or it may have had something to do with the state he was in about his all on 4 treatment. The patient had gone through a few sets of full dentures over quite a number of years and actually didn't mind the dentures too much but his story was that he had come into some money and felt as though he wanted to make some positive changes to his health and transition to a fixed prosthesis. He spent the money he had on this treatment but had recently fallen on harder times due to the pandemic.  The patient percieved nothing but problems from the treatment and reported he had chronic sinusitis since the treatment and belie...

Phase 2 of a rehabilitation in fixed pros

Image
Been pretty slack lately in making posts instead just jotting some notes onto a draft post and leaving it for later. I have just over 100 posts I have to sort through and write up so will try to find some time to do this. This post was from over a year ago from the full mouth rehab course. It will be good to look back and refresh myself on what I learned back then as well as have the opportunity to add on knowledge that I have picked up since then. It turns out I already posted a lot of the information on this post as it was from a draft where I had dumped notes from the whole course but I thought I Would repost it with some additional information I have picked up since then. The second stage of a fixed pros rehabilitation involves the refinement of preps and the records taken to guide the technician towards the construction of the restorations. It can be useful to think of the appointment this way i.e in terms of a set of objectives rather than a list of procedures. An overall guide o...

Day 2 of Tom Giblin's Fixed prosthodontic course

 Just finished the second day of the course. It was another full day and as usual went after the allocated hours but Tom was fine to stay back and finish things off and answer questions. He went through more theory, a lot on diagnosis and occlusion and we prepped some more on the model and he finished off with some case studies.  Prepping on the model was a lot better as we found the sweet spot dialing down the handpiece power and developed a lighter touch of the bur. I found that prepping benchtop was very awkward and I found that I had to redevelop the way I hold the handpiece and utilise the finger rest.  The course itself felt more like a stitch together of multiple other courses i.e implant, treatment planning, occlusion courses rather than a stand alone course which makes sense as he had not run this course before and had most of the slides from an onlay course he had run a number of years ago. It felt as though a broad base of the basics were covered which were goo...

Tom Giblin's Fixed prosthodontics course Day 1

 Today I attended day 1 of the fixed prosthodontic course. In contrast to the removable prosthodontic course, I'm less keen on fixed pros though I don't mind it too much. He spent quite a while going over the basics of the topic including the theory behind bur design, some material science and advocated "prep design with intent". I sense he advocates against a cook book approach or a matrix within which to make decisions and rather advocates understanding the reasoning and thought process behind WHY we make the choices we do. Using this knowledge we can make treatment decisions individual to each patient and clinical situation. He does advocate crowns over veneers for upper anterior teeth and tends towards onlays for posterior teeth. The reasoning behind this takes into consideration the forces that each restoration is put under and the reason why the restoration is done i.e upper anterior veneers are upt under tensile stress so tend to fracture and debond more than i...

Day 3 observing private practice prosthodontics

 Today I spent another day at the prosthodontic practice. It was a pretty packed day with a mixed bag of treatment, some cases just starting, some far along both surgery and fixed prosthodontics. -Bonded gold restorations lower canine buldup: The patient had a history of bruxism and had worn teeth. The anteriors had been restored as veneers in composite resin and the patient requested a gold restoration for the upper right premolar. The preparation was essentially a veneer with a buccal path of insertion. The veneer wrapped around over the buccal cusp with the finish line at the position of the cusp tip. It extended equigingival and mesially and distally between the line angles and the contact point, just far enough to mask tooth structure. In the middle of the facial surface there was a round 0.8mm diameter dent prepared into it for resistance form. The temporary restoration was a shrink wrap bisacryl which was locked into the interproximal undercut. There was an enamel chip on th...