Phase 2 of a rehabilitation in fixed pros
Been pretty slack lately in making posts instead just jotting some notes onto a draft post and leaving it for later. I have just over 100 posts I have to sort through and write up so will try to find some time to do this. This post was from over a year ago from the full mouth rehab course. It will be good to look back and refresh myself on what I learned back then as well as have the opportunity to add on knowledge that I have picked up since then. It turns out I already posted a lot of the information on this post as it was from a draft where I had dumped notes from the whole course but I thought I Would repost it with some additional information I have picked up since then.
The second stage of a fixed pros rehabilitation involves the refinement of preps and the records taken to guide the technician towards the construction of the restorations. It can be useful to think of the appointment this way i.e in terms of a set of objectives rather than a list of procedures. An overall guide or direction can be easier to manage mentally rather than constantly thinking about each and every step and thinking ahead rather than what you are doing at the time.
What we need to record in the appointment:
- Photographs of the temporary restorations to check the aesthetics: This should be done at the start of the appointment before any topical or local anaesthetic is administered to avoid affecting the smile line. Record the desired shade and stump shade if required.
- Length of teeth: Use a digital caliper to record the length from the gingival margin to the incisal edge of the temporary crown. This is to control the length of the final crown. Technicians tend to make the final tooth a tad longer than the temporary even if you give them a model of the temporary crowns. These will have to be cut away in the final removing the glaze or if not then they will affect the final aesthetics. Therefore, poorly fitting temps will be detrimental as there will be a gap at the margin or poor quality gingiva that will confuse the technician. It is important to get these measurements before removing the crowns as removing all the crowns will result in loss of the a positive vertical stop and performing the final preps can damage and inflame the gingiva removing that reference point. This is why checking your bite registration is at the right VD is difficult after all the crowns have been removed and the gingiva traumatised
- Impressions of the temporary crowns. PVS is preferred with good detail with a light body wash to ensure that the gingival margin is captured in good detail to confirm the desired length of the teeth. Local anaethetic before this impression is preferred as the impression locking in is likely to remove some temporary restorations. When taking impressions of temps that you ideally want to stay on,
pull one side of the tray down first resulting in off axis loading on
the temps. Alginate can be used if you want to avoid the temporaries being pulled off e.g if you were finishing one arch at a time. However they don't tend to capture as fine detail at the margins preventing good reproduction of the incisogingival dimension. Properly adjusted temporary crowns are required to replicate as close as possible the final product. Adjust the occlusion till all the posterior teeth are even in centric relation. Aim for a slight open contact of lower and upper anterior teeth in centric relation. Tend towards restoring the patient in the occlusal scheme they were in pre
treatment e.g canine guidance or group function. Their bruxing habits will tend to relapse them back to the scheme they were in before
treatment. Putting canines rise on a group function patient will lead to
the canines being snapped off.
heavy attrition patients require very grntle anterior guidance on protrusion because they will be moving to the anterior a lot and can't be locked in or the force on the crowns will be too excessive. Adjust the aesthetics until the patient approves the appearance. When adjusting anterior aesthetics "make a box" by adjusting the labial surfaces flat with a disc and flattening the incisal edges. Then carve out fractures by changing the inteprroximal contours, adding incisal corners and then adding line angles. - Measurements of upper to lower gingival margins: Use the digital caliper again to measure this distance that the tecnician can use to confirm that the mounting of the models reflect the reality. Getting a few measurements around the arch helps to ensure reliability e.g 15-45, 11-41, 25-35
-
Bite registration to mount models: The challenge here becomes recording the relationship of the upper and lower crown preparations as removing all the temporaries will remove any tooth to tooth relationship. This is where a tooth independant relationship becomes important in designing the occlusion i.e centric relation. After the rough preparations are done and the teeth are temporised there is no hurry to rush to finished restorations. Instead, the provisionals will act as prototypes to refine the occlusion and aesthetics until the patient has a stable, reproducible and comfortable bite and is satisfied with the shape and shade of the teeth. Once this is confirmed, the preparations can be refined and segmental bites taken. A bite of the temporaries can be taken and sections of the temporaries removed e.g lower 3-3, preps refined and a reline of this prepared area in the silicone bite taken. This will act as the stable reference point and will allow the posterior temporaries to be removed without losing the vertical and anterior-posterior position of the bite. Once the posteriors temporaries are removed and refined, a reline bite is taken in silicone in these areas.
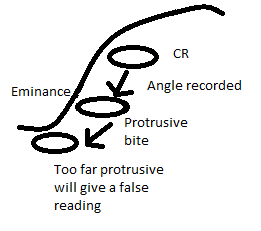
- Protrusive bite to program the semi
adjustable articulator condylar angle: The angle of the eminence in the skull and programmed onto the
articulator determines the steepness of cusps of the molars. If there is
a steep eminance the movement of the condyle down the eminence will
disocclude the teeth quickly on lateral movement so you can have more
steep cusps. The technician will mount models according
to the bite registration, put in the protrusive bite with centric unlocked on the articulator. They will then move the upper and lower members of the articulator until the teeth fit into the protrusive record then adjust the condylar ramps angle that corresponds with that bite record. You only need to have protrusive of 4-5 mm e.g about edge to edge for class 1 and 2 patients. Taking a record too
far in protrusive will give a false reading as the condyles in the patient will
be too far down the eminence which is less steep than the initial
protrusive area (Figure 1)
- Facebow record: This approximates the relationship of the maxillary teeth to the TMJ. the bite registration relates the maxillary teeth to the mandibular teeth. Theses two records together allow mounting of the models on the articulator.
- Stick bite to confirm the mounting is correct. This is essentially a bite registration with a long straight stick e.g wooden skewer embedded into the front of it. This is situated parallel to the interpupillary line and can be used by the technician to confirm the maxillary model is mounted correctly and identify any cants in the model orientation. Take a photo of the bite in place with the patient's eyes in frame to confirm they are parallel
- Photos of the final preparations
bite record
 |
| Figure 1 |
Most people function slightly forward of CR. (can test by retruding the mandible. if there is some posterior movement then they are forward of CR in "rest") The lateral pterygoid and anterior temporalis are muscles that protrude the mandible and the lateral pterygoid will alwasys be tensed due to habit so you won't be able to get them back into CR. Their jaw may relax more from bite record to insert resulting in anterior open bite. Patients can function very comfortably forward of CR until you work on their teeth. An AMPSA mouthguard can deprogram the jaws so the lateral pterygoid can relax and the condyles can seat fully in position. When the patient is habitually positioning forward of CR, when you work on them, the act of opening their mouth can cause deprogramming of the muscles and they can drop back into CR resulting in the same anterior open bite.
Vertical dimension can be determined by positioning the edges of the lower anteriors where they look good and function well and the upper anteriors where they look good and function well. If you have a comfortable VD adjustment but it is an aesthetic failure it is still a failure in the eyes of the patient. Having an aesthetically driven determinant of the vertical dimension will achieve their aesthetic goal and you can tinker with the position of teeth to achieve a functional goal after that.
If the temps are lost and there is no reference to bite onto then the patient is biting on preps. Patients will tend to then tend to posture protrusively as the posterior teeth will contact first. If the bite registration is taken in this protrusive position, the final crowns will have an anterior open bite when the patient drops back into CR. If a squash bite is attempted upper pres against lower preps, due to the hinge nature of the jaw, any opening will affect the anterior more than the posterior and there will be inaccuracies even with a facebow on a semi adjustable articulator. Ideally the bite is taken at the final restorative height by relining bites segmentally or using a leaf gauge if this is not possible
Comments
Post a Comment
Please leave a comment and let me know what you think or if there are any topics you would like covered in the future