Posts

Showing posts from 2021

A note on intraligamentary injections

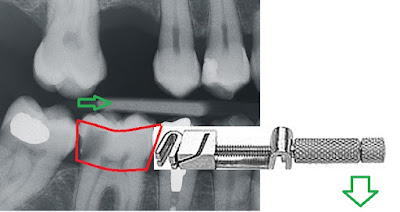
One thing I am never sure of during an intraligamentary injection is "is the needle tip in the PDL space or in the tissues?"Always use a small gauge needle even if you have a large gauge needle out for a block. A larger gauge needle will be too chunky to predictably fit into the PDL space. The angle of the needle is important and should be pointed towards the tooth surface. If it is inserted quite parallel o the tooth it will tend to sit in the gingival tissues and you will feel back pressure but will only be injecting into tissues with nothing reaching the periapical tissues. You may notice quite profound blaching in the area if you're inecting mainly into the tissues. In a thin biotype, it is quite easy for the needle to deflect away from the tooth and pierce the tissues back into the oral cavity. The best indication of a good needle placement is when you pull back, the needle tip is stuck in the PDL space and it is difficulty to remove. A patient with significant apica

Be careful with using wedges with perio patients

I had an issue recently with the use of a wooden wedge during a class II restoration in a perio patient. The issue was that when I inserted the wedge on the buccal, due to the patient's loose gingiva, the tip of he wedge moved apically and penetrataed through the lingual papilla. As a wedge is inserted, it will contact the teeth either side. As the angle of the roots taper away from each other, the further the wedge is inserted, the further apically it is forced. In a healthy periodontium, it will contact the gingiva and be foced back upwards. In this perio patient, the buccal papilla didn't provide much resistance which allowed the wedge to seat more apically into the tissues. Due to the interproimal periodontal pocket, the interdental col was exaggerated and so the tip of the wedge was guided downwards into the pocket. As I wasn't careful with the insertion, the wedge entered the tissues and went straight out the other side.  This caused bleeding and made moisture control

A note on denture adjustments

When you are adjusting the dentures to remove overextensions which cause instability or for sore spots, look at the tissues and see how they match up with the denture base. I don't put a lot of trust and faith in indicators such as pressure indicating pase because it is very dependant on the amount you put and the pressure at which you apply the denture to the tissues. If you put a very thick layer on the denture it may not be removed even with significant pressure. If the pressure spot is also quite light, it may not have enough pressure to displace even a thin layer of PIP. The material itself is quite viscous and sticky. Half the time, it will stick to the tissue and be removed from the denture surface. Other times, the viscosity will displace tissue at the sulcus and won't reveal overextensions. A light bodied material won't displace tissue as much and instead will be displaced off the denture revealing pressure spots. Inspecting the tissues is especially important at t

Sympathy vs Empathy vs Compassion

I wrote this title at the start of the year and couldn't really remember what I was thinking or writing about at the time. The concept of empathy, sympathy and compassion came up again recently though when I was reading through some of the material for the RACDS final examinations. At first glance, the differences between these terms are quite subtle but what they mean for us as practitioners has quite a profound difference. Sympathy is the act of understanding what the other person is feeling i.e recognising their emotions and motivations. Recognition of other's feelings is the basis of our human interaction and is essential in a practitioner's skill-set to get a read for the patient's desires, goals and reasons for seeking treatment. It is really the first step in gaining meaningful information that underpins the whole treatment plan. It is not enough simply to gather objective data about probing depths, carious lesions and restorations. In the end, percieved patholog

The SLOB Rule

Image
 The SLOB rule is a radiographic rule for determining the location of certain objects intraorally with 2D xrays. I forgot about this rule until very recently when I saw a youtube video on it. There are many helpful youtube videos that will be much more helpful than this post as it is good to see the relationship of the objects in motion and with actual examples of xrays taken.  The SLOB theory is essentially grounded in geometric principles. Use of this rule allows the clinician to determine the buccolingual relationship of two intraoral objects with 2 plain films. SLOB is broken down to " S ame L ingual, O pposite B uccal" meaning that if the objects shift to the same side as the xray tube head is moved, the object is on the lingual and if the object in question moves to the opposite side, it is on the buccal. The SLOB rule is useful in endodontics as it can be used to determine which of the canals or roots is which on the plain film. Once a 2D xray is taken, all spatial rel

Split thickness periodontal flap

Oral surgery in the dental region requires a good knowledge of the histological layers as manipulation of these layers can be used to serve different purposes. The connective tissue layer is formed of loose collagen, contains blood vessels that run parallel to the surface in the deeper layers. Periosteum is a thin layer of non stretchable fibres that attach directly to the bone. If it is raised as a flap or as part of a full thickness flap, the non stretchable nature of periosteum hinders advancement of the flap unless the periosteum is released with horizontal incisions or split from the superficial tissues. If the flap needs to be advanced to close an extraction site, close an implant site or make room for bone graft material, you may want to release the flap. If you are going to be splitting a flap, it may be beneficial in cases where a bone graft is required as well as advancement of the flap. Splitting the flap allows separation of the connective tissue which allows advancement of

A few notes on temporary crowns

 Temporary crowns can be tight when seating for a few reasons: -One is that the crown is too well fitting due to the accuracy of the material. Hydraulic pressure from a very parallel crown preparation may stop the crown from seating especially once there is temporary cement in it. Therefore the occlusion may be spot on when trying the crown on but may be too high once it is cemented.  -Deformation on removing the temporary crown can cause it not to seat completely. If the crown comes off in the putty matrix, don't touch it for at least a few minutes to let it fully set before it is manipulated -Shrinkage of the material can cause it not to seat well even if it had fit well initially. This is especially noticeable if there are fine preparation features on the tooth e.g thin slots, grooves or pin preps. -If you have added composite resin to the temporary crown to fix an open contact, it can stop the crown from seating if you have added too much. Therefore it is safer to do one side a

Impressions for chrome dentures

 Lately I've been using alginate in a stock tray for the final impression for chrome dentures. If poured up quickly after the impression, alginate is a fantastically accurate material and has proven more than adequate for chrome impressions. One issue that can arise is bubbles in the mix and on tissue surfaces. To minimise bubbles in the mix, invest in an alginate mixer as this will minimise the problem. Take some alginate on your finger and smear it onto tooth surfaces especially occlusal surfaces and the distal surface of the most distal tooth to explude bubbles from the impression surface. Do this wile your assistant is loading the tray and seat the tray shortly after. For dentures that will be significantly tissue borne e.g free end saddles, avoid over seating the tray which will displace the tissues too far and result in an overextended denture. For kennedy class 3 dentures it is not so critical as the dentures will be mainly tooth supported.

Observing prosthodontics 4

Image
A few months ago I went for another day to observe a prosthodontist in private practice. I had the notes from the day written down but had put off posting it due to laziness. Below are some of the procedures I observed on the day: - Review of suckdown resins to close black triangles: The patient whose consultation that I observed at a prvious visit had had his resin additions done with a suckdown technique to close the black triangles. His black triangles were as a result of triangular teeth with mild recession therefore required a prosthodontic solution. I was observing the review appointment where the teeth were to be separated. Embrasures were cut into the teeth a the bonding visit and spaces opened to allow piksters to go through. Line angles and the location of the proximal contact was defined with the waxup but the teeth were still stuck together. Suck down resin veneers will stain at edges making areas that aren't bonded easier to see staining at first review but doesn'

Customising wedges

Image
Wooden wedges are very useful tools in restorative dentistry. They allow for the protection of soft tissues during tooth preparation, retraction of the rubber dam, separation of the teeth to protect the adjacent tooth, seal the matrix band against the cervical margin and separate teeth to allow a contact point to be formed accounting for the thickness of the band, thickness of bonding agent and shrinkage of restorative material. The issue with most wooden wedges is that they are too large in an occlusogingival direction so tend to displace and deform the matrix band away from the adjacent tooth. This requires some customisation of the wedge to fit each specific cavity that it is being used on. Burnishing the band doesn't tend to overcome this and just leaves a lumpy surface on the interproximal surface. Ideally we want the band sitting passively against the adjacent tooth without having to force it there.  The next time you prepare a class II cavity, look at the interproximal area

Why teach?

This was a post that I started writing at the start of the year when I thought that I would be starting clinical teaching last semester. It was a bit of a journey to be onboarded and so it took until semester 2 to start and definitely wasn't the role that was advertised but the concepts that I started to explore are still the same. I think at the time I was questioning my motivations to teach to form a clear picture in my head what I wanted to get out of this. I wrote 4 points down in the draft which I will elaborate on: - My teachers were bad:   At university we had some quite good people teaching and supervising us but later on we also had some very bad ones. There was a point about halfway through our degree where university changes i.e school changing faculty and subsequent funding changes resulted in a massive pay drop for the supervising staff. As a result, all the quality teachers left to better paying jobs. For most of them I doubt it was the money that caused them to leave

A note on the medical history

The medical history is something that is only important when it is important. By that I meant that the vast majority of people we encounter will have no medical conditions that will significantly affect the way we do our work but when we have a patient with significant comorbidities it is vital that we identify these so we can plan accordingly. This may involves modifying our treatment plan, omitting certain procedures or consulting with our medical colleagues for advice or to arrange multidisciplinary treatment. Some patients who are significantly ill are not suitable to be treated in the general practice setting and may have to be referred onto colleagues with experience treating medically compromised patients or have to be treated in a hospital setting. A common mistake we make in private practice is that the medical history is often left to the patient to fill out and there is often not enough emphasis from the practitioner on the importance of this legal document. The issue with t

Prosthetic limitations of all on 4?

A few months back I encountered a patient in the public clinics who had had an all on 4 prosthesis placed in the maxilla and mandible a few months prior. Personally, I felt as though he was an incredibly highly strung person and at the state at which I met him I would be hesitant to do any large scale dentistry on. His personality may have been a true reflection of himself or it may have had something to do with the state he was in about his all on 4 treatment. The patient had gone through a few sets of full dentures over quite a number of years and actually didn't mind the dentures too much but his story was that he had come into some money and felt as though he wanted to make some positive changes to his health and transition to a fixed prosthesis. He spent the money he had on this treatment but had recently fallen on harder times due to the pandemic.  The patient percieved nothing but problems from the treatment and reported he had chronic sinusitis since the treatment and belie

Another note on Tofflemires

Image
Working in the public acute care clinics means that a lot of the dentistry that I do when I am there is compromised. The goal is to provide relief of pain and to deal with the patient's main complaint in the simplest, quickest way possible simply due to time constraints. Therefore lately I have found that I am using a tofflemire matrix a lot more than I used to. I've previously written about some tips for using Tofflemire matrices: http://dental-tidbits.blogspot.com/2020/01/limitations-of-tofflemire-bands.html http://dental-tidbits.blogspot.com/2021/03/difficult-restorative-appointment.html http://dental-tidbits.blogspot.com/2020/09/a-note-on-tofflemire-matrix-retainers.html http://dental-tidbits.blogspot.com/2019/09/review-of-old-blog-post.html The difficulties I have found with tofflemires is that initially it is very difficult to get a contact with the adjacent tooth and when you can get a contact it is of poor contour and in the wrong location much to close to the adjacent

Teaching technique

When I have been checking student's work in the simulation clinic, most of them are expecting me to have a look and give my feedback straight away. Instead, what I have found useful is before even looking down at it, asking the following: -What are you up to? -How did you go? (any difficulties?) -How is it?  -What do you need to do to make it better? I find from these questions that there is a spectrum and some students are over confident of their abilities, some have an accurate appraisal of their skills and some lack confidence but are not doing too bad. I think these questions are useful to develop their self critical skills as it is important for them to be self sufficient in appraising their own work. They need to be able to visualise what they want the work to look like and be able to figure out if and why their own work departs from the ideal. Only then will I look at their work and give my feedback.

Reflection: Teaching session class II composites

The other day I had a session as a clinical educator in the university simulation clinic. I was surprised to find when I turned up that I was the only dentist there and the person who normally led the class was on leave. Eventually it fell to me to "lead" the session which just involved announcing what the exercise was for the day and what steps were involved. On reflect it wasn't a spectacular effort but I will definitely be able to do better next time. The topic was class II composites and I had some thoughts about some common things that I explained during the session and some common errors that I noted. Hopefully when I am in this position in the future I would have a bit more of an idea of what I am doing. We were using the V3 matrix system and covered the basics of how to use this system. Some notes on each component: Band, wedge, ring. There are different sizes of matrix band, the coloured plastic markers in the container will tell you which size the band is. When

Difficult extraction today

Today I had a very difficult extraction case which I struggled with. I knew it would be from the preoperative xray and by looking at the patient. My recognition of the difficulty of cases is improving but I do find myself looking at most of the extraction cases and judging them as difficult. This is partly a reflection of my wary nature. I think it is useful to analyse the case properly beforehand and recognise the difficulties for the purpose of planning contingencies. I don't think that planning should produce fear of the procedure but instead reinforce that things can go wrong and that when they do you will be prepared for it. It is also useful to recognise when a case may beyond your skills and referral or guidance is warranted. In this case, a lower 6 had curved roots and the patient had a massively thick jaw and tongue. The large tongue is always a difficulty with the administration of a IDN block. Getting the patient to relax their tongue is useful but not always possible. H

A case study with some lessons

Image
This is a string of photos I took almost two years ago and have been meaning to write about for a while. There were a few things I did wrong and a few lessons I have taken from the case. My memories are a bit sketchy on the exact details of the case but I will do the best I can. -The patient presented to me complaining initially of spontaneous pain to the lower left second molar exacerbated by temperature changes. To me that is sounding like a pulpitis of some sort, leaning towards the irreversible diagnosis clinically.The 37 tooth had a couple of deficiencies on the occlusal and lingual aspects as well as an occlusal amalgam and a mesial crack apparent. -As there was no visible carious lesion I chalked the problem down to the deficiencies in the tooth and patched them up with GIC. I didn't investigate thoroughly into the diagnosis, didn't perform pulp tests or even take an Xray. I am unsure why I didn't do this but possibly it was that the patient was very anxious and I w

Denture tooth set up

Image
Setting an ideal position of  teeth for a lower full denture is of the utmost importance due to the almost universal instability of the lower full denture. One of my pet peeves is how the technician wants to set everything with an "anatomic" class 1 relationship. Tooth position can be in a wide range in the natural dentition but this is anchored in bone with periodontal ligament support. Because of this, natural dentition tooth position can exist outside the zone of soft tissue influence a la the neutral zone concept. The influence of external factors on tooth position becomes more obvious as there is loss of periodontal support in diseased states which allows buccal and lingual soft tissues as well as the occlusion to move the teeth resulting in flared teeth and diastemas.  In contrast to the natural dentition, full dentures are at the mercy of the movement of soft tissues during speech and function which can affect their success if denture base extensions are improperly des