Tips from Dr. Renner
You can apply apical force with a file, there is minimal chance of fracture if you apply apical force only without rotation. You might bend the file in one itself but it probably won't break. It is when you start rotating as well that files separate.
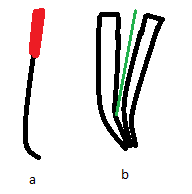
When there is a curve at the apex of a root canal, curve the file in the apical region (a) as if you enter with a straight file it will hit the outside of the canal curve and feel like a hard stop (b). If you curve the file you must have the curve facing the same way as in the canal (A radiograph will help) but to get a more precise feel you must apply apical force only, withdraw vertically, rotate slightly (Not locked into the canal) and reapply apical force. At a certain point in the rotation you will find a spot where the file progresses further than all the other positions. This means you have negotiated the curve. from then it is short vertical filing motions. If you pull too far out you may lose the location. Once the file is withdrawn, you can look at the direction of the curve and get buccolingual knowledge of its direction.
When there is a curve at the apex of a root canal, curve the file in the apical region (a) as if you enter with a straight file it will hit the outside of the canal curve and feel like a hard stop (b). If you curve the file you must have the curve facing the same way as in the canal (A radiograph will help) but to get a more precise feel you must apply apical force only, withdraw vertically, rotate slightly (Not locked into the canal) and reapply apical force. At a certain point in the rotation you will find a spot where the file progresses further than all the other positions. This means you have negotiated the curve. from then it is short vertical filing motions. If you pull too far out you may lose the location. Once the file is withdrawn, you can look at the direction of the curve and get buccolingual knowledge of its direction.
Taking an xray in a gagging patient: Sit them up, Get the tube positioned, have your DA ready to press the button, Open mouth, Get them to hold their breath while placing the film, bite down and then get the a safe distance and expose the film. they can remove the film themselves if it isn't endo (Otherwise they may dislodge the files)
In other news...
Check the occlusion before performing an anterior restoration on a patient with a deep bite. Today I added Cr to the palatal surface of an incisal wear case. I was all ready to place CR all over the palatal but I checked the bite in CO and protrusion. It turns out there was only a small corner that I could place the CR in and I did so tapering the composite to a fine thickness towards the cingulum. This resulted in minimal occlusal modification post restoration and a smoother appointment overall.
Rotated teeth exaggerate caries on a bitewing. I saw a DO carious lesion on the Bw that seemingly extended into the pulp. Signs that I should have seen on the xray was slight overlap of the adjacent tooth, cusps weren't lined up, Couldn't see clean triangle shape through the enamel, Dentine caries was very diffuse and the pulp horns looked abnormal. May get the xray to place here.
When prepping a tooth for a crown I have found that sometimes the margin is very close to the neighbouring tooth's interproximal surface. This is especially true in teeth such as molars that are less tapered and more vertical. To remedy this, It is an idea to lower the margin on these teeth (ensuring you aren't going subgingival) which will allow the taper of the tooth to take this margin away from the neigbouring tooth. Otherwise, it may be difficult to get impression material into the space below and around this tight area. When bringing the margin down, it is an idea to use a tapering bur to lower the margin and a shoulder bur to tidy it up. The tapered bur will allow cutting on the junction between the vertical prep wall and the horizontal margin and the shoulder bur will flatten off the "ski ramp" in the enamel area.
Something I learned by myself: If you are making temporary crowns before the impression which is good as it can give you an idea of if your reduction is sufficient and if the crown is retentive/undercut then you must make sure that all of the temporary material is removed from the teeth before the impression. If there is material on the occlusal then this will be transferred to the final cast. This will prop the occlusion up in the models and will cause the crown to be too high in the final. This will necessitate lots of grinding/remake of a porcelain crown.
Moving the patient to a sunlit area for shade selection can help a lot as the sun is where they will be spending a lot of their time.
Comments
Post a Comment
Please leave a comment and let me know what you think or if there are any topics you would like covered in the future