Photography
-Full smile
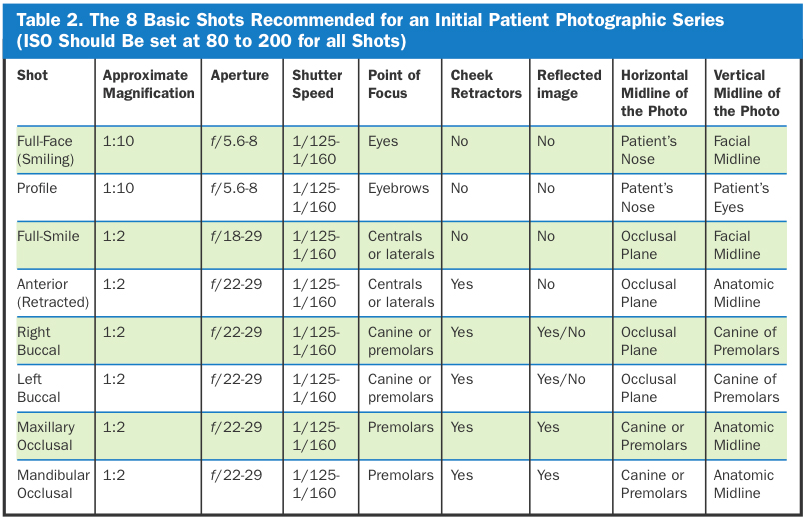
For this shot, a point-and-shoot camera should be switched to macro mode; DSLR macro lenses should be used at approximately 1:2 magnification. Attempt to take the photo from directly in front of the patient, avoiding a downward or upward angle of view. The patient should exhibit a natural smile, with framing of the photo extending from the right to left corner of the mouth. Point of focus for this shot is on the central or lateral incisors. The horizontal midline should be the incisal plane; the vertical midline should be the anatomic midline.
-Anterior retracted
Patient seated with dentist in front. Cheek retractors used with the cheeks pulled outwards away from the teeth. A common mistake is to pull the lips outwards and backwards which pulls the buccal area inwards. Use the largest retractor possible to avoid the centre of the upper and lower lip from appearing in the photo. Air dry the teeth. the teeth should be in MIP but they can be slightly apart to aid in recording incisal edges. The horizontal midline should be the occlusal plane and the vertical midline should be the anatomic midline.
-Right buccal and Left buccal
Direct method: retract the side to be photographed and hold the other sides retractor slack to keep the lips apart. Adult cheek retractors (U shaped) can be used but it is useful to use buccal retractors (V shaped). The teeth should be in MIP, the horizontal midline should be the occlusal plane. The vertical midline should be the canine
Indirect method: Single retractor is used on the contralateral side and a buccal mirror is used to retract tissue and visualise teeth. To avoid mirror fog the mirror can be warmed or air can be blown by the assistant or the patient can hold their breath. The patient opens their mouth and the mirror is inserted. Once the mirror is outside the teeth the patient closes their teeth. The mirror should be resting on the soft tissues buccal to the most distal tooth. The point of focus is the premolars and the horizontal midline is the occlusal plane.
-Maxillary occlusal
The patient should be reclined to approximately 45° and asked to raise his or her chin. The operator should be in front of the patient. Cheek retractors should be placed so that the lips can be pulled upward and outward; in some cases the medial corners of the cheek retractors will touch at the middle of the upper lip. If properly used, the cheek retractors will keep the buccal soft tissue and lips off of the teeth, allowing for proper visualization of not only the posterior teeth but the anterior teeth as well. Standard cheek retractors or “fork” retractors may be used.
The mirror should be inserted so that the edge extends behind the most posterior tooth. It may sometimes rest on the tuberosity as a means of stabilization. Rotate the mirror downward so that the back side is touching the lower incisor teeth. In doing so, the operator can help the patient “open wide” but also attain the 45° angle needed to properly capture the image.
-Mandibular occlusal
The patient should be reclined at a minimum of 45°, and should raise the chin as far as possible (neck extended maximally). Standard retractors (or a fork retractor) should always be used to keep soft tissue and lips off of the teeth. If standard cheek retractors are used, they should be positioned to pull the lips downward and outward. Insert the mirror so that the end rests on soft tissue behind the most posterior teeth, making sure that it is not touching the teeth. Rotate the mirror upward so that the back of the mirror is resting against the maxillary incisor teeth; the image should be taken at approximately 45° to the mirror.
Comments
Post a Comment
Please leave a comment and let me know what you think or if there are any topics you would like covered in the future