Basics of clinical photography notes
Notes taken from the ADA webinar: Basics of clinical photography by Dr. Peter Sheridan
Clinical photographs are used for records and documentation but also professional communication, education marketing etc
Issues with intraoral cameras are they have a limited range of views. It is easy to use but poor quality, colour and distortion. Can't integrate the image into the whole mouth context or comparison with other teeth
Criteria when choosing cameras
-Quality of images
-Lightweight
-Value
-Integrated (can buy all hardware from the same manufacturer)
-Ease of use
-Depth of field
-Special features: eg in built post production software
-Longevity
Lens should be 60mm not 105mm macro lens. These days, DSLRs are using apsc or dx sensors which are smaller which changes the field of view of the lens. The 60mm lens working at 1.5 crop factor and acts as a 90mm lens and the 105mm lens works as a 150mm lens. The 105mm lens will be heavier, have no depth of field, and will go hunting for a focus point whereas the 60mm lens is more forgiving
General rule for focussing is the picture will be focussed 1/3 in front of the focus point and 2/3 behind. Therefore for frontal shots you should focus around the canine for focussed incisors to molars. A 60mm lens will have 20mm depth of field compared to a 105mm lens which has 0mm.Lateral shots are in a flat plane and so doesn't matter so much. When focussing, you should pick aim at a point distant to the object of interest, half depress the shutter button till focus then reframe so the object comes back into the centre.
For reproducible shots, after the first shot switch to manual mode. then move the camera back and forwards till the frame comes into focus. This point will be the same distance from the object as the original photograph.
Enough light is needed to expose the image which is determined by a combination of ISO, Aperture and shutter speed. Manual exposure setting is the only setting that allows complete control. Other settings will have different exposures every shot and will have different results. Dental photography allows us to have these constant settings as the subjects are fairly constant in terms of size, distance, ambient light and motion. We also compensate for the ambient conditions with our flash.
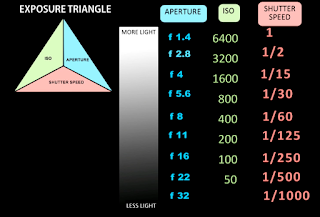
Aperture controls the size of the opening into the sensor. Larger numbers mean a smaller opening meaning less light into the sensor. Extraoral shots require more opening as the flash is a further distance from the subject
Major settings: Aperture is the only variable setting depending on the type of shot
-Autofocus: Single point focus (Fixed)
-Spot metering (Fixed)
-Manual exposure mode (Fixed)
Shutter speed 1/200 sec (Fixed)
ISO 100 (Fixed)
Aperture (f stop-Variable) F10 Extraoral F20 intraoral
-Drive mode: Single shot (Fixed)
-White balance: Flash (Fixed)
-Image quality: JPEG fine and large (Fixed)
For occlusal shots, we aim to capture till the 7s. Metal retractors work better as it is easier to fit a mirror in. Get the patient to hold retractors and pull outwards and upwards for maxillaryx shots, and downwards for mandibular shots.
Comments
Post a Comment
Please leave a comment and let me know what you think or if there are any topics you would like covered in the future